|
9-20-01
Build an Applesoft BASIC Simulator by
Erick Tejkowski
After hearing from a few Apple ][ diehards, it occurred to me that some REALbasic newbies might be making the
transition to REALbasic from Apple BASIC. Many folks started their programming careers using the venerable
Applesoft BASIC on the various models of the Apple ][ (yours truly included).
In their honor, this week we will build a simple Applesoft BASIC simulator, which will allow you to enter
and "run" graphics commands from the Applesoft BASIC language. Hang on to your seats as we set the time traveler to 1980...
Preparation
Ok, here we are in 1980 staring at the TV screen of our fancy Apple ][ machine. Each Apple machine at the time
came with a copy of Applesoft BASIC, a BASIC intrepreter. One of the first things an Applesoft BASIC programmer learned to do was
create low resolution graphics. They were lousy compared to today's standards, but they have a certain retro charm.
Our project will simulate some of the low resolution graphics commands of the Applesoft BASIC language.
| Command |
Function |
| HOME |
Clear the screen with the current color. |
| COLOR=x |
Sets the current color to 'x'. 'x' can be any integer between 0 and 15 inclusive. |
| HLIN x1,x2 at y |
Draws a horizontal line from x1 to x2 at the y coordinate. |
| VLIN y1,y2 at x |
Draws a vertical line from y1 to y2 at the x coordinate. |
Low resolution Applesoft BASIC
graphics have a coordinate system much like REALbasic with the origin (0,0) at the top left. Unlike REALbasic, the dimensions
of the screen are 40 columns wide by 48 columns high.
Look here if you would
like to learn more about the Applesoft BASIC commands.
Build the Interface
Launch REALbasic and open the default window, Window1. From the toolbar, add the following controls to the interface:
| Control |
Settings |
| Canvas |
Name : tvscreen
(Many people used a TV set as the Apple II's monitor.)
Width=400
Height=480
|
| Listbox |
Name : programlist
Where we will output any data that normally appeared onscreen in Applesoft BASIC. |
| EditField |
Name : codefield
Where we will enter a graphics command. |
| PushButton |
Name : PushButton1
Pushing this button executes the command. |
Feel free to experiment with the layout, but it might look something like this:
Add the Code
Double click any control to open the Code Editor. Before adding any code, though, select Edit->NewProperty and create the following two Properties:
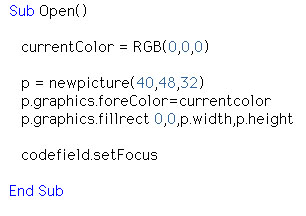
To begin the coding, navigate to the Open event of Window1 and enter the following code:
This code initializes the color to black (the same as on an Apple ][) and creates a picture object. The picture, p is where
we will draw the graphics for each command. Notice that it is very small (only 40x48 pixels). We will stretch this picture over a
larger (but similarly shaped) Canvas to display it to the user. Since this is low resolution graphics, it doesn't matter that we lose resolution.
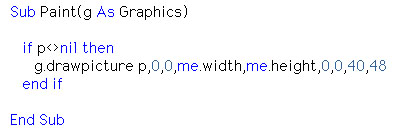
Next, open the Paint event of the tvscreen Canvas and enter this code:
You might guess that this code "stretches" (called scaling in graphics lingo) the picture p over the Canvas.
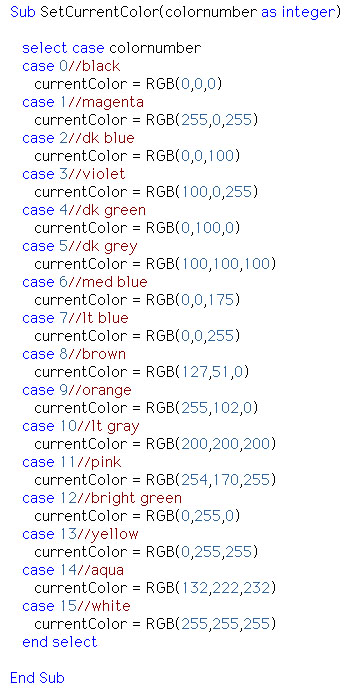
Select Edit->New Method to add a new method named SetCurrentColor(colornumber as integer). We will pass this method a color number (between 0 and 15)
and adjust the current color accordingly:
The final step in this code is to process the commands a user enters. The code is somehwat involved and takes up a lot of space on a web page. For this
reason, I will briefly discuss it here, but not display it. To see it, you can download the completed project at the end of this tutorial.
Each time a user enters a command and presses "Enter", we have to figure out which command it was and act appropriately. This
occurs in the Action event of PushButton1.
We start by looking for the "HOME" command, since it is only four letters long.
If we find it, we fill in the picture p and exit the code. If the "HOME" command wasn't entered, then the user may have entered one of the
other three commands: COLOR, HLIN, and VLIN. The remainder of the code determines which of these commands has been entered. If the COLOR command is entered,
the SetCurrentColor method gets called. If the command is HLIN or VLIN, the code draws the appropriate sized line and refreshes the tvscreen Canvas.
If, at any time, our code gets some garbage command or improper syntax, we warn the user that they have entered an invalid command.
Conclusion
This week you need to download the completed project to see all of the code. Go dig up that collection of
old Byte magazines and scour them for low resolution graphics code. If you are feeling really daring, you might add some code
that allows a user to save their work of art or the sequence of commands used in creating the picture. when you get finished playing with the
code set your time machine back to 2001. See you next week!
9-18-01
News
by
Erick Tejkowski
New REALbasic Version!
REAL Software has posted a new version of REALbasic: RB 3.5.1.
This is a free upgrade for 3.5 owners and looks to include many bug fixes, so don't miss it!
Transfer files with QuickTime.
Alfred Van Hoek has finalized the first version of his QuickTime File Transfer plugin. It comes in
demo and pro versions and allows you to download files from a URL to a RB FolderItem. It works on all platforms that REALbasic 3.5.1 supports.
Fancy Buttons with REALbasic.
Searchware Solutions has released cPictureButton 1.0. This class
lets you create buttons of any shape you desire. All you have to do is supply the picture and mask. cPictureButton does the rest.
Marching Ants and Crosshairs.
ZegSoft has announced the immediate availability of Neato! Widgets, which
gives you instant access to the "Marching Ants" and other related goodies.
New Calculator Plugin.
Bob Delaney has an interesting REALbasic plugin on his site, entitled MPCalc Plugin.
MPCalc plugin provides the functionality of my multi-precision RPN calculator to a REALbasic program.
It can handle numbers with up to 30,000 decimal digits.
It can also handle numbers whose absolute values lie between 1e-167100000 and 1e+167100000.
As a Carbon and PPC plugin it can run under either Mac OS 9.x or Mac OS X.
Over forty scientific functions are now available.
|