|
8-9-01
REALbasic Screen Capture Tutorial by
Erick Tejkowski
If you've used a Mac for any time at all, you have no doubt stumbled
across the various screenshot keyboard shortcuts available
in Mac OS 8/9. Mac OS X users have a special treat in the
"Grab.app" application that accompanies a default installation.
This week we'll create a simple screenshot application . Our version will be different, because it has a moveable viewer. What
good is a moveable viewer? It allows you to take screenshots of the same exact area and size each time. Doing the same thing with
other screenshot tools is tedious if not impossible.
By the end of this week's project, you should know how to use plugins and irregularly shaped windows in your REALbasic project.
Preparation
This week's tutorial makes use of two different plugins:
Before you begin this tutorial, download both of these plugins and place them in the REALbasic "Plugins" folder. Joe's plugin takes care of
snapping the screenshot for us. Michio's plugin provides us the opportunity to create irregularly-shaped windows. The idea
behind this project is that we will draw a see through ring on the screen. Then, whenever a user selects Save, whatever appears within the ring
will be saved on the desktop as a JPEG image (thanks to Joe's plugin). In reality, the ring will just be a window
that has a transparent center and no other
common window features. Michio's plugin lets you create windows that look like anything but a window. For our example, we'll
create a window that looks like a red ring.
Building the Project
Launch REALbasic and double click Window1 to open its Window Editor. Change the properties of Window1 to match
those in the following image:
Add an EditField control to Window1 and set its LimitText property to 1. Why the EditField?
We'll hide it from view and use it to capture keystrokes of the number keys 1-6. This will give us the chance to
let users alter the size of the screen capture ring. For now, you can place EditField1 anywhere in the window.
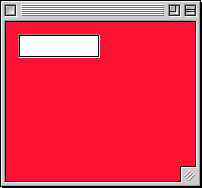
By now, your interface should look like this:
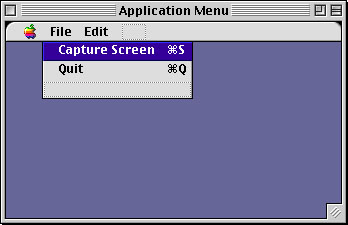
Next, close Window1 and open the Menu Editor. Add a new menu item to the File Menu like so:
Close the Menu Editor and select File->New Class. Change the properties for this class to match the following image:
The final step before you can start coding is to add a sound file to the project. Peek inside the
System suitcase with ResEdit if you really like the Finder's Cmd-Shift-3 camera sound. When you've decided on a sound,
drag it into the project window.
Adding the Code
The code for this project is contained in two places: in Window1 and the App class.
The Window code is based on the code provided with Michio Ono's plugin. It takes care of drawing the window with a transparent center
and also manages the redrawing of it. The code within the application class does the task of taking the screenshot and saving it as a JPEG file.
To start, open Window1 and double-click it again to open its Window Editor. By selecting Edit->New Property, create the following three
Window1 properties:
- ringPicture As Picture
- ringX As Integer
- ringY As Integer
Next, create a new method (Edit->New Method) and define it as :DrawCaptureRing
Finally, fill in the code for each element in this code listing:
Window1.DrawCaptureRing:
Sub DrawCaptureRing()
//Erase the last ring
ringPicture.Graphics.ForeColor = RGB( 255,255,255 )
ringPicture.Graphics.FillRect 0,0,screen(0).width,screen(0).height
//Draw the new ring
ringPicture.Graphics.ForeColor = RGB( 0,0,0 )
ringPicture.Graphics.penwidth=10
ringPicture.Graphics.penheight=10
ringPicture.Graphics.DrawRect 0,0,me.width,me.height
Hide
MicSetWindowRegion ringPicture
Show
Visible = True
//capture any new keystrokes
editfield1.text=""
editfield1.setfocus
End Sub
Window1.MouseDown:
Function MouseDown(X As Integer, Y As Integer) As Boolean
ringX = X
ringY = Y
return true
End Function
Window1.Paint:
Sub Paint(g As Graphics)
//Redraw the window
if Self.Visible then
DrawCaptureRing(FALSE)
end if
End Sub
Window1.MouseDrag:
Sub MouseDrag(X As Integer, Y As Integer)
Dim newLeft, newTop As Integer
if ringX <> X or ringY <> Y then
newLeft = (X-ringX)
newTop = (Y-ringY)
Left = Left + newLeft
Top = Top + newTop
end if
End Sub
Window1.Open:
Sub Open()
//Create a new picture to store the screenshot
ringPicture = NewPicture( screen(0).width, screen(0).height, 32 )
//Init the window
Show
Visible = true
self.refresh
editField1.top=-100
editField1.setfocus
End Sub
Window1.EditField1.KeyDown:
Function KeyDown(Key As String) As Boolean
//this checks for keypresses
//on the 1-6 keys
//to change the size of the "capture ring"
select case key
case "1"
if self.width<>100 then
DrawCaptureRing
self.width=100
self.height=100
DrawCaptureRing
end if
case "2"
if self.width<>200 then
DrawCaptureRing
self.width=200
self.height=200
DrawCaptureRing
end
case "3"
if self.width<>300 then
DrawCaptureRing
self.width=300
self.height=300
DrawCaptureRing
end
case "4"
if self.width<>400 then
DrawCaptureRing
self.width=400
self.height=400
DrawCaptureRing
end
case "5"
if self.width<>500 then
DrawCaptureRing
self.width=500
self.height=500
DrawCaptureRing
end
case "6"
//fullscreen
if self.width<>screen(0).width then
DrawCaptureRing
self.width=screen(0).width-10
self.height=screen(0).height-10
self.left=0
DrawCaptureRing
end
end select
return true
End Function
Once you have all the code entered for Window1, open the App subclass and add this code to the EnableMenuItems event:
app.EnableMenuItems:
Sub EnableMenuItems()
FileCaptureScreen.enabled = true
End Sub
Select Edit->New Menu Handler and choose the FileCaptureScreen menu that you created earlier. Add the following code to it:
dim p as picture
dim f as folderItem
dim thefilename as string
dim d as date
d = new date
thefilename = d.longtime+".jpg"
//we can't have a ":" in a file name, so replace it with a dash
thefilename = replaceAll(thefilename,":","-")
//capture the screen within the frame
p = CaptureScreen(Window1.left+10, Window1.top+10,Window1.width-10, Window1.height-10)
f=DesktopFolder.child(thefilename)
if f<>nil then
if p<>nil then
//save the picture as a JPEG
CaptureSound.play
f.saveAsJpeg(p)
end if
end if
Conclusion
If all of this code has you nervous, you can download the completed project. When you have a working copy of the project,
you should be able to resize the screenshot area by pressing one of the numbers keys (1-6). Pressing Cmd-S should place the
screenshot on the desktop with a filename displaying the time it was created. Keep in mind that this application only works with
Mac OS 8/9/Classic. This is due to the fact that neither Joe's nor Michio's plugin support Carbon. Until next week, happy shooting!
8-7-01
REALbasic News
by
Erick Tejkowski
New Beta Version of REALbasic!
REALbasic 3.5b3 is another honest-to-goodness beta, and all that
implies. Betas represent the closing stages of a new release. At this
point, development focuses on fixing bugs, rather than adding new
features..
3.5b3 fixes issues with RbScript and the DataControl, in addition to
numerous other enhancements and bug-fixes.
Morph your windows!
Michio Ono is at it again, releasing a new plugin
entitled WindowUtil. This new plugin
lets you create non-standard window shapes for PPC and x86.
REALbasic Digests.
Ever since bumpo.net shut down its REALbasic list archives, RB users have been a bit
in the dark. Luckily, Doug Holton has moved the whole mass of information to the Yahoo lists.
You can find the new lists here:
New Plunger.
Alfred and company have updated RBPluginPlunger
again. The latest version lets you peer
inside the new Office Automation plugins, which is especially nice, since Office Automation is
currently undocumented.
Expanding your Market?
REALglot beta 1.0b1 is now available.
With REALglot you can:
- Prepare your user interface for localization by inserting constants
into all of your UI elements
- Import and export the values for your constants making it easy for
others to translate your applications text into other languages using
any text editor
- Use the Values Editor to edit constant values for various languages
- Use Appleglot glossaries or create your own glossaries to make
translating even easier
- Check for conflicting constant names
StyleGrid.
Einhugur has posted a new version of the popular StyleGrid plugin.
The latest version has:
- faster cell rendering than previous versions.
- Win32 Target is now supported.
- New properties
- New Methods
- tweaks and fixes
|


 Boot Panels