|
5-3-01
Take Control of your Command Line by
Erick Tejkowski
The release of Mac OS X marked the introduction of the Unix command line to thousands of Mac-o-philes all over the world.
Despite feeling like a step backwards in time, the command line (typically accessed using the Terminal application
included with Mac OS X) affords Mac junkies all sorts of tricks
and hacks for customizing the Mac OS.
REALbasic 3 introduces a new feature, called the Shell Class , which gives you the ability to use command line functions from
within your own REALbasic project. This new feature makes it a cinch to give your OS X tweaks an interface as well as saving you from having to
look up the hack each time. It also helps out those folks who are terrified of the command line (believe me, they're out there). Now, they can take part in the
Mac OS X fun too.
Background
One of the more popular Mac OS X hacks around involves changing the genie effect of the dock.
The hack involves launching the Terminal application and entering one of the following commands:
- defaults write com.apple.Dock mineffect genie
- defaults write com.apple.Dock mineffect suck
- defaults write com.apple.Dock mineffect scale
Once you've entered a command, you must force quit the dock to make the changes take effect. To do so from the command line, you have to:
- Look through the various processes
- Find the PID of the Dock.app
- And, finally, kill the process using the PID.
Wheeww! As you can see, it takes quite a bit of work to accomplish this simple hack via the command line and it is hardly elegant
as far as interfaces go. Luckily, REALbasic changes all of that.
Create the interface
To illustrate, begin by launching a copy of REALbasic 3. By default,
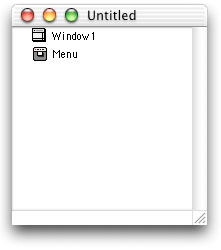
REALbasic starts you off with an empty project, as shown here:
Double click Window1 in the Project Window to open the window. Then, from the toolbar,
drag two PushButtons and three RadioButtons onto your Window1
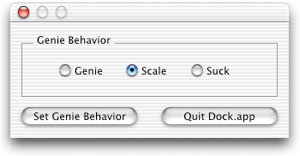
interface. You can lay out the interface out anyway you desire, but it might look something like this:
The RadioButtons will permit a user to choose a genie effect, while the PushButtons will be used to change the genie effect and to restart the dock.
For the purposes of this demonstration, the PushButtons and RadioButtons will be named and labeled according to this table:
| Control Name | Caption Property |
| RadioButton1 | genie |
| RadioButton2 | Suck |
| RadioButton3 | Scale |
| PushButton1 | Set genie Behavior |
| PushButton2 | Quit Dock.app |
Add the code
Now, you have an interface, but it doesn't do anything yet. To add functionality,
double-click PushButton1 to open the Code Editor. Add the
following code to its Action Event.
// Create two variables to store the command and the Shell Object.
Dim Command as string
Dim Terminal As Shell
// Which genie behavior has the user chosen?
// i.e. Create a command depending on which RadioButton is currently selected.
If RadioButton1.Value then
Command = "defaults write com.apple.Dock mineffect genie"
ElseIf RadioButton2.Value then
Command = "defaults write com.apple.Dock mineffect suck"
ElseIf RadioButton3.Value then
Command = "defaults write com.apple.Dock mineffect scale"
End If
// Create the Shell object
Terminal = New Shell
// Now, execute the command
Terminal.Execute Command
If Terminal.ErrorCode=0 then
// No errors; everything worked without a hitch.
MsgBox "genie behavior changed"
Else
// Ooops, an error occurred! Display the error.
MsgBox "Error Code: " + Str(Terminal.ErrorCode)
End If
This code looks at which RadioButton is currently selected and builds a command accordingly.
The commands should look familiar from the Terminal example earlier. Next, it's time to execute the command.
To do so, you must first create a Shell Object. Once you have, it's a trivial matter to send the command
to the Shell Object using the Execute method.
If the command executed properly without errors, then ErrorCode will equal "0" (zero) and we display a
message to the user. If something other than zero is returned, then
something went wrong and we display the error instead.
Of course, this code only takes care of the first step. The next step is to kill the dock, so we can see the effect of the changes we made. You could continue using the Shell Object and write some similar code
that would find the PID of the Dock process and kill it. But, why bother? There's an easier way to do the same thing with REALbasic.
AppleScript to the rescue!
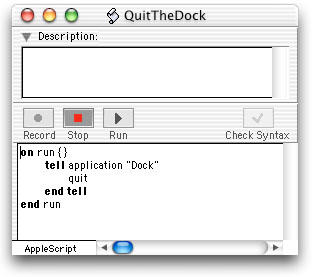
Yep, that's right. AppleScript can take care of this laborious function for us. Fire up the
AppleScript Script Editor application and create a script like this:
Once you have entered the necessary code, save the AppleScript as a Compiled Script making sure not to include any spaces in
the name of the file. For this example, I chose the name QuitTheDock.
After you save the script, you can quit the Script Editor and return to REALbasic. Add the script you just made to your REALbasic
project by dragging it into the Project Window from the Finder or by choosing File->Import.
Finally, double-click PushButton2 to open the Code Editor. To the Action Event of PushButton2 add this one line of code:
QuitTheDock
Test and Build the Project
Believe it or not, that's all there is to it! To test your handiwork, choose Debug->Run. If everything works
as it should, you should be able to change the genie behavior of the dock at will.
Once you have decided that you have created the project correctly, build the final application
in REALbasic by choosing File->Build Application. Now, you won't ever have to type those commands in by hand again and the GUI gods
will look down on you favorably.
Where to go from here
If you don't like typing or had any troubles recreating this project, you can download
If you have no interest in programming, you can also download
Keep in mind that this same approach can be applied to all sorts of Mac interface hacks. To give you some ideas, be sure to look at these links:
|