|
1-10-02
REALbasic Merlin Simulator by
Erick Tejkowsi
Back in the late 1970's, Parker Brothers introduced a great handheld electronic game machine called Merlin.
Merlin played six different games that, while crude compared to today's gizmos, could hold a kid's interest for hours on end (trust me on this one).
This week, we will begin with Part 1 of a multi-part REALbasic tutorial to build a Merlin simulator.
Background
If you aren't familiar with the Merlin game, perhaps a good place to start is with a little background information.
The web holds a wealth of Merlin goodies, from photographs of the machine to descriptions of its functionality. To get a sense of how
the machine worked, check out some of these links:
Merlin was a popular game with kids (in reality, pretty much any handheld electronic device was popular... much like today). Merlin was special though,
because it played many more games than other popular machines of the era and, despite its foot-long enclosure,
was fairly portable. (For some perspective, it was a tad longer than a Newton and a bit narrower.).
Create the Interface
Since our Merlin Simulator project is somewhat involved, we are going to break it up over several weeks. This week, we'll focus on
creating the interface. Next week, we'll begin adding functionality to the simulator.
Your first step in creating the Merlin interface will likely begin with a graphics application. Use whatever is handy to create 'PICT' files for the following
interface elements:
- The Merlin's Case
- Number Buttons - Two graphics will suffice, one for the On state and one for Off. In other words, the same two graphics will
be used for all 11 Number buttons.
- Utility Buttons - At the bottom of the Merlin are four buttons, that I will call "utility buttons". They control game selection and some other features.
For each button, create two graphics (again, On and Off). When you're finished, you should have 8 different graphics for these buttons.
If you aren't handy with graphics or simply don't have the time to create them, don't fret. You will get a chance to
download the completed project, which has taken care of the dirty work for you.
Once you have some graphics, drag them into the Project Window. Next, open Window1 and add the following controls to
the window:
| Control Name | Control Type |
| Canvas1 | Canvas - Set the Backdrop property to the Merlin Case graphic you created earlier. |
| NumButton | Canvas (quantity 11) - Give all eleven number buttons the same name and assign an Index number to each between 0 and 10 |
| UtilButton | Canvas (quantity 4) - Give all four utility buttons the same name and assign an Index number to each between 0 and 3 |
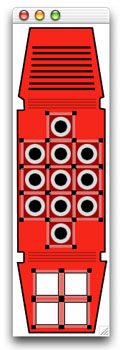
If you are following along, your interface might look like this (Note! Canvas1 occupies the entire size of the window and is behind all
of the buttons):
Next, download these button classes and drop them into your project. The classes are named NumButtonClass and UtilButtonClass.
Once you have added them to the project, change the Super property of each NumButton to NumButtonClass and the
Super property of each UtilButton to UtilButtonClass. If you download the completed project at the end of this
tutorial, you needn't download the button classes (they are included in the final project). The separate download of the classes is meant strictly as a convenience
to you should you wish to follow along and build the project.
In case you are wondering how these classes work, check out this
previous ResEx tutorial.
This week's custom classes work in a similar fashion.
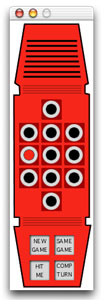
When you've finished constructing the interface, select Debug-Run to see your handiwork. If all goes well,
it shouldn't look too much different than the previous interface image. It will act differently, though. When you press
the buttons in the interface, the Number buttons will change to red when pressed and the Utility buttons
will also behave like buttons, dimming when depressed.
Conclusion
Well, that's it for this week. We covered a lot of preliminaries. Next week, we'll start looking at some code to make the
Merlin Simulator actually do something. And, as promised, you can download the completed project and demo applications.
See you next week!
1-8-02
REALbasic News
by Erick Tejkowsi
REALbasic 4 now available!
The big news from MacWorld Expo this week for REALbasic users is that REALbasic 4 has been released.
REALbasic 4 has many new goodies and some important fixes. REAL Software surveyed their installed customer base
and rolled the most requested features into REALbasic 4. Some of the more important ones include:
- All-new ListBox: Greatly expanded power and flexibility with the addition of
cell borders and gridlines, complete control over cell background painting,
text drawing, and more, plus new events for tracking user interaction. New
Header functionality with a Sort widget and new sort functions and more.
- All-new EditField: Now supports paragraph alignment for the whole EditField
or on a paragraph-by-paragraph basis, plus new events for tracking user
interaction, and enhanced for Mac OS X.
- External Project Items: provides a way to keep a single copy of
commonly used code that you use in multiple projects. Update that copy, and its changes
will be updated in each project the next time you open it.
- Find and Replace: finding stuff in your projects is dramatically
easier, with
much more control over what and where to search. Finds names, declarations,
and more.
- Drag and Drop: dragging items from the Project Window to controls
or the Code
Editor automatically adds useful code (such as running the AppleScript,
playing the sound, showing the Window and so on). Dragging a
control from the
Toolbar to the Project Items window creates a subclass of that control.
- RbScript: now compiled on PowerPC (both Mac OS X and previous
versions of the
Mac OS) and with dozens of new functions and methods.
- Multimedia, Graphics, and Games: new depth and resolution properties for
pictures, pan and volume for sounds, fog for Rb3D and more
- Custom Controls: Canvas has 3 new properties: UseFocusRing, AcceptFocus, and
AcceptTabs and 3 new events: GotFocus, LostFocus, and KeyDown greatly
expanding what's possible with the Canvas.
- Interactive shell: now access shell functions which run continuously.
Previously, the shell only worked with functions which ran, performed their
action, returned the result, and ended (such as 'ls').
Carbon Events Plugin 2.1.1
Will Cosgrove has posted a new version of his Carbon Events Plugin (v 2.1.1).
The full feature set is:
- Access to a toolbar button
- Scroll wheel support
- live window resizing
- Access to the application Dock tile menu
- Standard Alert Sheet support
- Ask Save Changes & Discard Save Changes sheet support
- Put file dialog sheet support
- Quit Event notification
- Complete proxy icon support with icon dragging and window's path menu
- The ability to get any folder by type & domain
- The ability to set and get long file names
Component X Graphics
Brad Hutchings has released a new plugin called Component X Graphics, which
lets you manipulate graphics.
|