|
12-13-01
REALbasic Icon Tutorial by
Erick Tejkowsi
The Mac OS has had the ability to display 32 bit icons for a few years now and they look beautiful compared to their lesser-colored
cousins, the 8 bit icons. Mac OS X extends this beauty by also displaying large icons.
But, how does one incorporate them into a Mac OS X application made with REALbasic? This week we'll show you how!
Create the Icons
The first step on your journey to 32 bit icon bliss is to..... create icons. There are a number tools out there that will help you
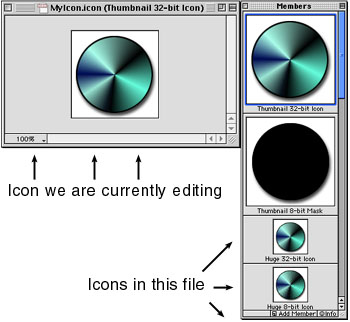
design and build 32 bit icons, but my favorite is Iconographer. Iconographer lets you create and preview your icon masterpiece
as you work on it, showing the various icon sizes and masks along the way. Mac OS X supports icons up to sizes of 128x128. Iconographer can handle these as well.
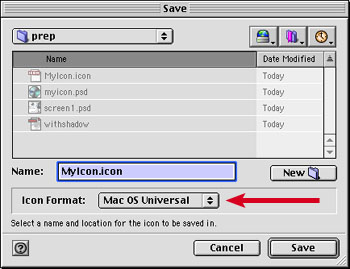
Then, when you're finished with the artwork, Iconographer will permit you to
save the result as an icon resource file. It is this resource that we need for inclusion into our REALbasic project. Select "Mac OS Universal"
in the Save Dialog when you save the icon.
Break Out the Resource Editor
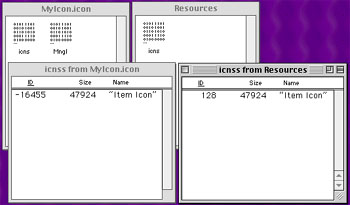
Now that you have built your icon resource file, open it using a resource editor. ResEdit will work fine for this. Select the 'icns' resource within
and copy it to the clipboard. Choose File->New and create a new resource file. Give it a name like "Resources" and paste the 'icns' resource from the
clipboard into this new file. With the resource selected in the new file, press Cmd-I and change the resource number to 128.
Break Out the Resource Editor
Now that you have built your icon resource file, open it using a resource editor. ResEdit will work fine for this. Select the 'icns' resource within
and copy it to the clipboard. Choose File->New and create a new resource file. Give it a name like "Resources" and paste the 'icns' resource from the
clipboard into this new file. With the resource selected in the new file, press Cmd-I and change the resource number to 128.
If this is the only icon you need for your application, you're finished! Save the resource file and drag it into your REALbasic application. When
you build for Carbon, your icon will appear in all its 32 bit and 128x128 glory in Mac OS X.
Document Icons
Your application may have other icon needs besides the application icon. For example, if your application will create documents, you may want
the resulting documents to display a 32 bit icon. The process works similarly for document icons. Create the icon, save it, and open it an a resource editor.
To your "Resources" file, add the new icons, incrementing the resource number as you go. Since the application has a resource number of 128, the first document
icon will have a resource number of 129; the second document icon would be 130, and so on. There is one "gotcha" when dealing with document icons, however.
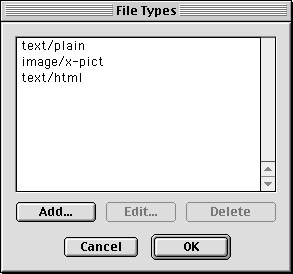
Consider this scenario. Suppose your application will create TEXT and HTML documents and will also open (but not create) JPEG graphic files. Since TEXT and
HTML files are the only documents that your application will create, these are the only icons you must produce. As you assign the resource numbers,
you must strictly follow the order that they appear in the "File Types" dialog, skipping over any file types that will not need icons.
So, for this example, the icon for TEXT would have a resource number of 129 and the HTML document would have a resource number of 130.
Conclusion
You may download the application icon if you'd like to see how the resources should look when you are finished. See you next week!
12-11-01
REALbasic News
by Erick Tejkowsi
New REALbasic Beta!
REAL Software has announced the immediate availability of REALbasic 4.0 b2.
You're so Transparent!.
Alexander Cohen has posted a very cool plugin for Mac OS X: Window Alpha Plugin v1.2. It gives
you the ability to make windows in your REALbasic projects transparent. Until very recently, this was a Cocoa-only feature, so this is
a very welcome addition to Carbon (thanks Apple) and, thus, to REALbasic (thanks Alexander).
Sort Things Out.
Charles Yeomans has posted SortLibrary 1.5. As
described by Charles: SortLibrary is a freeware (but not public domain) library providing high
quality REALbasic implementations of quick sort and other sorting
algorithms, just like the C guys have.
Homeward Bound
Wondering how to create a folderitem that represents a user's Home folder in OS X? Kevin Ballard offers this handy snippet:
dim f as folderitem
f = DesktopFolder.Parent
What's your Preference?.
This just in from Patrick Wynne.
I've updated my recent CFPrefs class to version 1.1 and posted it on my
web site.
This version:
- fixes a problem with mismatched encodings preventing the retrieval of string values containing funky characters
- adds Get/SetArrayValue methods for storing string arrays in your preferences
CFPrefs can be downloaded here.
"What is CFPrefs?" I hear you ask. Well, let me tell you.
CFPrefs is a REALbasic wrapper class for the Core Foundation
Preferences Services available under OS X (and back to OS 8.6 with
CarbonLib 1.1). Preference Services gives you a standardized method of
getting/setting your application's preferences data. Core Foundation
manages all file access for you, so you no longer need to create and
manage your own prefs file. All you have to do is store and read the
data in your app.
|


 Boot Panels