|
5-10-01
Text Clippings Made Easy by
Erick Tejkowski
Of all the great technologies available to Mac users, perhaps the most overlooked is that of
the Clipping file. Clipping files permit you to store data in a file that can be viewed from
the Finder. Furthermore, they are especially nifty, thanks to drag-and-drop.
Text clippings are handy for quick storage of text data such as:
- Internet bookmarks
- Email addresses
- Software registration codes
- Code Snippets
- Phone Numbers
- ResEx hacks
Of course, clippings can hold other kinds of data, but for now we will limit the discussion to text.
Creating Text Clippings
To create a text clipping, open your favorite text editor (even Simple Text will work here).
Type a few letters, select the text, and drag that text to the desktop.
The text becomes its own miniature file. Double click the clipping file in the Finder and it opens to
reveal the text in a Finder window. While the text clipping is open, you may also copy the text to
the clipboard.
Resource Information
Text clippings usually consist of two or three resources. The important one here, though, is the 'TEXT' resource.
As you probably guessed, this is where the text of the clipping resides.
So, what on Earth does this have to do with REALbasic? Armed with REALbasic and your knowledge of
text clippings, you can create a miniature "database".
REALbasic makes it easy to work with resources. Text clippings are
already very versatile, but sometimes it is a nuisance to constantly open the clipping to view its contents. This example
shows you how to keep tabs on your text clippings and make them even more useful than ever.
Build the Interface
To create the interface for this project, fire up REALbasic and open the Window1 Window Editor.
From the toolbar drag the following into the window:
- Listbox
- EditField
- PushButton
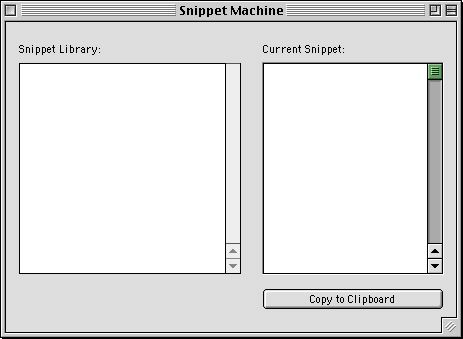
The Listbox will display your library of text clippings, and the EditField will show the the contents of the Clipping
currently selected in the Listbox. Finally, the PushButton will give you the chance to copy text to the clipboard
from the EditField. Make certain that the MultiLine property of the EditField is checked. Your interface might look
something like this:
Add the Code
To make the interface do something, double click Window1 to open its Code Editor. In the Open Event of the window, add this code:
dim n,i as integer
dim f as folderItem
// Get the FolderItem
// for the folder that contains
// the clippings.
f = GetFolderItem("clippings")
if f <> nil then
//how many items are in this folder?
n = f.count
//now loop through the items in the
//folder and look for text clippings with MacFileType = 'clpt'
for i=1 to n
//if this item a file (i.e. NOT a folder)
if f.item(i).directory=FALSE then
//if this item is a text clipping
if f.item(i).MacType="clpt" then
//then add it to listbox1
listBox1.addrow f.item(i).name
end if
end if
next
end if
This code first looks for a folder named "Clippings" in the same directory as your application.
If you haven't yet, create this folder now. This folder will be your storage place for text clippings.
Next, the code loops through the items in the "Clippings" folder, looking for clipping files.
When it encounters one, the file's name is added to the Listbox.
Next, open the Code Editor to the Change Event of the Listbox and add this code:
//This code executes when you
// select an item in Listbox1
dim f as FolderItem
dim rf as ResourceFork
// Is there anything in the listbox yet?
if me.listindex>=0 then
// Get the file with currently selected name
f=GetFolderItem("clippings").Child(listBox1.text)
if f<>nil then
rf=f.OpenResourceFork
//get the text from 'TEXT' resource #256
//and put it in EditField1
EditField1.text=rf.GetResource("TEXT",256)
rf.close
end if
else
//nothing in the listbox, so display nothing in the EditField
EditField1.text=""
end if
This code will fire each time a row is selected in the Listbox. When a row is selected, the code
creates a FolderItem representing the particular Clipping file. This FolderItem's resource fork
is then opened and the 'TEXT' resource is retrieved (resource # 256) and displayed in the Editfield.
The code concludes by closing the resource fork.
Finally, add code to the PushButton's Action Event :
Dim c as Clipboard
//Make a new clipboard object
c=New Clipboard
//copy the text from editField1
//to the clipboard
c.text=EditField1.text
c.close
This code copies the text from the EditField to the Clipboard. Of course, you can also select the text manually
and copy it using the traditional Edit->Copy menu. You gain this functionality for free with the EditField.
Test and Build
The last step is to test and build the project. Test it by selecting Debug->Run.
When you are sure that everything works as expteced, select File->Build Application.
Once you have finished building your application, add a bunch of text clippings to your "Clippings"
folder and you gain instant access to the contents of each. The project is also compatible with Mac OS X,
so you can create an Aqua version as well.
If you are having troubles getting the code to work, you can
Download the code and the finished product.
5-8-01
REALbasic News by
Erick Tejkowski
Have you heard? It looks like MacTech is dedicating its June issue to REALbasic.
I assume this means that most (or all?) articles will be REALbasic related. And, don't forget the
May 2001 Programmer's Challenge, which breaks from the C/C++
tradition of the past by featuring a REALbasic solution.
Are you a developer who is planning to attend the Apple WWDC? If so, be sure to stop by and say "Hi!" to REAL Software.
They will be attending and exhibiting at WWDC, not to mention participating in Development Tools for Mac OS X.
Matt Neuburg
has recently announced the availability of source code
from his forthcoming book, REALbasic:The Definitive Guide (O'Reilly). Matt's book is certainly a handy tool for
advanced programming with REALbasic, so don't miss it.
Split Software has
released ColorBevelButton Plugin v1.1.
ColorBevelButton Plugin is a bevelbutton control for REALbasic.
It has the features of normal bevelbuttons, but also permits you to:
- Set the color of the text, button, and menu popuparrow
- Enable/disable menu items
REAL Software recently announced that they have a new member on their team, named Mars Saxman.
Mars' role, as described by REAL Software:
Mars' primary area of responsibility will be developing our new compiler.
What does this mean for you?
Once it's in place, the new compiler will make your code run faster and
allow us to help you get to more platforms more quickly.
He will also eventually be working on a new linker that will make REALbasic
applications much smaller in size than they are now.
Welcome Mars!
|