#!/usr/bin/perl -w # # Copyright 2000 by Michael Coyle # Released under GPL. # # Call it with: # [an error occurred while processing this directive] # # Get the file name from the browser... $file_name = $ENV{'QUERY_STRING'}; # Open the file... open (EP, $file_name); # Print to the browser... print "Content-Type: text/html \n\n"; # Load the file and keep spitting it out to the browser... while () { chomp; print "$_ "; } # Close the file and go home... close EP #!/usr/bin/perl -w # # Copyright 2000 by Michael Coyle # Released under GPL. # # Call it with: # [an error occurred while processing this directive] # # Get the file name from the browser... $file_name = $ENV{'QUERY_STRING'}; # Open the file... open (EP, $file_name); # Print to the browser... print "Content-Type: text/html \n\n"; # Load the file and keep spitting it out to the browser... while () { chomp; print "$_ "; } # Close the file and go home... close EP

3D
3D Photo Gallery (Part 1)
3D Photo Gallery (Part 2)

Audio
Poor Man's MIDI
Make A Metronome
iPod Tricks (Part 1)
iPod Tricks (Part 2)
iPod Tricks (Part 3)
Laugh Track Machine
Audio Player with Reverb
Shepard Melody
RB Phone Home
Build a Drum Machine

Custom Controls and Windows
Double Click Listbox
Draggable Metal Window
Double Click Canvas
Custom Buttons
Custom Buttons Part II
iTunes-style Listboxes
Custom Controls


General RB
Scrolling Windows
Using Mesage Dialogs
Case-Sensitive Word Finder
Introduction to Stacks
Wiggle Window
JPEG in PDF
Listbox Checkboxes
Background Applications
Listbox Auto-Find
Virtual Volumes
Time Tracker
Software Distribution (Part 1)
Software Distribution (Part 2)
Software Distribution (Part 3)
Software Distribution (Part 4)
Exceptions
Tips and Tricks
Text Clippings Made Easy

Graphics
Drawing a Simple Gradient
The SpriteSurface: Space Game
Image Spinner
Cropping Graphics (Part 1)
Cropping Graphics (Part 2)
Cropping Graphics (Part 3)
Cropping Graphics (Part 4)
Shimmer Graphics
Lissajous Figures
Simple Screen Capture
Vector Graphics
Kaleidoscope Images
Stegonography
Spirals!
Image Table
RB Magnifying Lens
Screen Capture
Color Picker Tutorial

Hacks
Ghost Grab
Speedy Mouse Extension
iTunes Plugins
iTunes Skinner

Mac OS X
Global Hot Key Event (Carbon Events)
Login Welcomer (Carbon Events)
Add/Remove Buttons
Resizable Sheets
Mac OS X Preferences Window
Using Sheets in REALbasic
Build a Bundle (Part 1)
Build a Bundle (Part 2)
Dock Your Passwords
Mac OS X Debugging
REALbasic Mac OS X Icon Tutorial
Animate Your Dock
RB and the Command Line

Menus
Window Menu
Templates Menu
Listbox Menu

Novelty
Guessing Game
Calendar Trivia
Tile Mixer
Zip Code Finder
Happy Valentine's Day
Merlin Simulator (Part 1)
Merlin Simulator (Part 2)
Merlin Simulator (Part 3)
Buzzword Machine
AppleSoft BASIC

Printing
Print to PDF

Registration
Registration Code Validation
Network Registration Codes

Resources
Picture Extractor (Part 1)
Picture Extractor (Part 2)

Serial
Caller ID (Part 1)
Caller ID (Part 2)
Caller ID (Part 3)

Speech
Speech Recognition

Socket Communication
Easy Peer-to-Peer File Sharing
MacPAD Version Checking
Display Web Image In Canvas
HTML IMG Tags
Version Tracking
Even Smarter Instant Messaging
Web Tiler
JavaScript and REALbasic
Stock Ticker (Part I)
Stock Ticker (Part 2)
AIM Mate

XML Manipulation
Simple XML Introduction

Video
Big Brother Video Capture

Note: All articles without a byline were written by Erick Tejkowski. When cleaning the site I removed them because the code differed from page to page, and I have yet to put them back in.

resexc2.gif (20k)


REALbasic for Dummies
by Erick Tejkowski

$19.99 @ Amazon


Files are in Stuffit 6.5 or earlier, or ZIP format.
Download Stuffit Expander

Tell us about a bad link.

Easy Peer-to-Peer by Seth Willits
04-07-04


Peer-to-Peer File Sharing
Have you ever wanted to implement a peer-to-peer file sharing application but never knew how? Believe it or not, you can accomplish this in REALbasic in less than 130 lines of code! In this tutorial we’ll create a small application that can connect to another copy of it on a different computer (over the internet or a LAN) and send and/or receive a file. Also, if you’ve ever just wanted to get your feet wet in networking code, this tutorial would be a good read.

Sockets
All network communication takes place through sockets. A socket is bound to a port and an address and data is sent from the one socket to the other via a protocol. A protocol is simply a language that is defined by the creator and must adhered to for one to implement it. There are numerous protocols, each serving its own purpose and having its own advantages and disadvantages, but probably the two most commonly used protocols are for TCP and UDP.

EasyTCPSocket
To handle all of our network transmissions, we’ll use an instance of the EasyTCPSocket class which is new to REALbasic 5.5. The EasyTCPSocket class is a subclass of TCPSocket that has been designed to make it easier to implement socket creation. Normally, any user of the TCPSocket class would have to make up their own protocol to know which part of the data received is a command or data, but in the EasyTCPSocket class command and data are now explicitly recognized with the SendMessage method and ReceivedMessage event, similar to the UDPSocket and Datagram classes.

Design
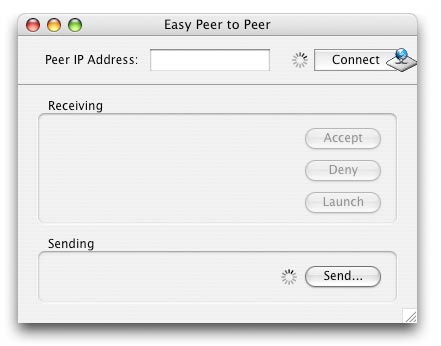
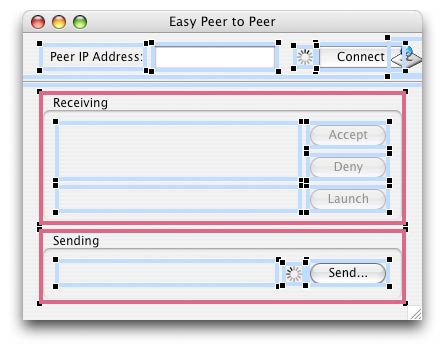
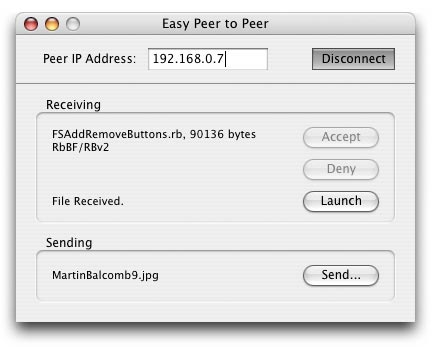
To start off, just create an interface like the one below, taking note of the three StaticTextFields.


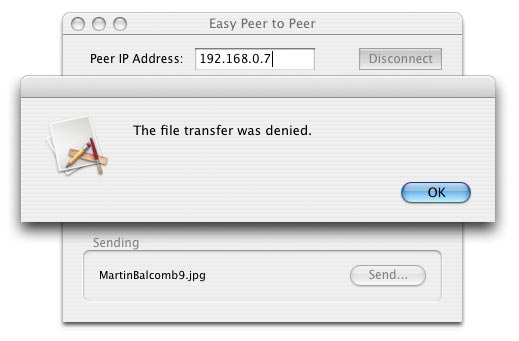
The first step in the process to use the application will be for the user to specify their peer’s IP Address and click the Connect button. Only one user will have to do this since when one connects, the other will be connected automatically. Then one of the users will click on the Send… button and select a file to send. Once a file is selected, the file name and size are sent to the other user and they have the choice of accepting or denying the file. If denied, the sender is alerted with a dialog. If accepted, the sending application will then begin the file transfer. Once the file has been completely transferred, the receiving application will allow the user to click on the Launch button which will then open the transferred file. To disconnect, either user simply has to click on the Connect button which is now labeled Disconnect.

The names of the buttons in the project from top to bottom are as follows: BtnConnect, BtnAccept, BtnDeny, BtnLaunch, and BtnSend. The name of the EditField for the IP Address is EFPeerIPAddress, the two ChasingArrows controls are ProgressConnect and ProgressSend, and the three StaticTextFields from top to bottom are StatReceivingFileName, StatReceivingProgress, and StatSendingFileName. The name of the socket is PeerSock, and it is an instance of the EasyTCPSocket class. To create an EasyTCPSocket, drag a TCPSocket to the window and change its superclass from TCPSocket to EasyTCPSocket using the properties palette.


Connecting and Disconnecting
The first step we’re going to take is the connection. In order for a socket to be connected to, the socket must a) be listening for connections, and b) be listening on a specific port. In the Open event of the window, call the Listen method the PeerSocket instance, and in the properties palette, set the Port value of the socket to a number larger than 1024 such as 7564.

Sub Open()
    PeerSocket.Listen
End Sub


In the Action event of the Connect button (which should be set to a Toggle BevelButton), we’ll need to test the value of the button and from there determine whether we’re supposed to be connecting or disconnecting. When the value is true we should connect and when it is false we should disconnect.


Sub Action()
    if me.Value then

        /// Connect
        me.Caption = "Disconnect"
        ProgressConnect.Visible = true
        PeerSocket.Address = EFPeerIPAddress.Text
        PeerSocket.Connect
    else

        /// Disconnect
        me.Caption = "Connect"
        PeerSocket.Disconnect
    end if
End Sub


Before any connection can be made we’ll have to set the IP address to connect to, and that is done by setting PeerSocket.Address to the Text value of the EFPeerIP EditField. After that, we call the Connect method of the socket. All that is required for a socket to disconnect from another is a simple call to the Disconnect method.

When a socket connection is successful the Connected event of that socket is fired. This is true of both the socket initiating the connection and the socket which is listening for a connection.


Sub Connected()
    ProgressConnect.Visible = False
    BtnConnect.Caption = "Disconnect"
    BtnConnect.Value = true
End Sub


If a socket connection fails, then the Error event of that socket is fired and the appropriate error code is specified as the code parameter to the event. In addition to connection errors and unexpectedly dropped connections, the Error event is also triggered when sockets successfully disconnect from each other. The error code 102 in the error event is the error code for a successful disconnection. Knowing this, we test for 102 in the Error event and let the interface respond appropriately. When any other error code is encountered, we display a dialog box to inform the user. Error code values can be found under the SocketCore class in the Language Reference manual and online reference.


Sub Error(code as Integer)
    ProgressConnect.Visible = false

    if code = 102 then
        BtnConnect.Caption = "Connect"
        BtnConnect.Value = false
    else
        MsgBox str(code)
    end if
End Sub


Selecting and Sending a Send Request
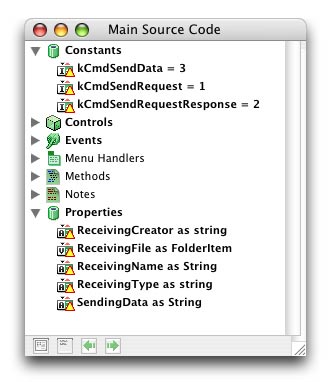
The next step after initiating a connection is to select a file to transfer and send the file name and other data to the peer so that they can accept or deny the file. Before going any further add these properties and constants to the window:


When the Send… button is clicked on, an OpenDialog box will pop up and allow the user to select a file. If a file is selected we’ll open it using a BinaryStream and read all of the contents of the file and put it into the SendingData property. Next, we assemble the contents of the message to be sent to the peer application which requests permission to transfer the selected file. The format of the message to be sent will be the file name, the size of the file in number of bytes (using LenB on the SendingData string), and the MacType and MacCreator of the file, all separated by EndOfLine characters. (The type and creator of the file aren’t used in the Accept/Deny process, but it’s easier to send them now instead of later.)

When data is sent using the EasyTCPSocket command, not only is a message sent, but a command value is also sent. The integer values for the commands are purely whatever you make them. In this project I’ve decided on using three commands which have the integer values 1, 2, and 3. These are the kCmd constants we created earlier. Since we first need to request permission to send the file, we’ll use the kCmdSendRequest value as the command parameter when using PeerSocket.SendMessage.


Sub Action()
    dim dlog as OpenDialog
    dim file as FolderItem
    dim bin as BinaryStream
    dim message as string
    
    // Show dialog
    dlog = New OpenDialog
    file = dlog.ShowModalWithin(self)
    if file <> nil then
        // Open File
        bin = file.OpenAsBinaryFile(false)
        if bin = nil then return
        BtnSend.Enabled = true
        StatSendingFileName.Text = file.Name
        
        // Read File
        SendingData = bin.Read(bin.Length)
        
        // Close File
        bin.Close
        
        // Disable
        me.Enabled = false
        ChasingArrows2.Visible = true
        
        // Build Message
        message = file.Name + EndOfLine + str(LenB(SendingData)) + EndOfLine
        message = message + file.MacType + EndOfLine + file.MacCreator
        
        // Send Request
        PeerSocket.SendMessage kCmdSendRequest, message
    end if
End Sub


Acceptance and Denial
No we're not talking about the five step process towards acceptance of death, we're talking about file transfers. :^) When the receiving application gets a message the ReceivedMessage event is fired. The parameters to the event, command and data, are the command and data values that the sending application specified to the SendMessage method of the sending socket. So when the peer application gets the message we sent from the Send button, it will see the kCmdSendRequest command value and know that the message sent with the command is a request for permission to send a file. Thus, we can pick the name, size, type, and creator out of the data parameter just as it was put in. When extracting the data, we put the values into the ReceivingName, ReceivingType, and ReceivingCreator properties for later use. If the file is accepted, then when it is received these properties will be used along with ReceivingData to recreate the file.


Sub ReceivedMessage(command as Integer, data as String)
    Select Case command
    Case kCmdSendRequest
        ReceivingName = NthField(data, EndOfLine, 1)
        ReceivingType = NthField(data, EndOfLine, 3)
        ReceivingCreator = NthField(data, EndOfLine, 4)
        
        StatReceivingFileName.Text = ReceivingName + ", " + str(NthField(data, EndOfLine, 2)) + "         bytes" + EndOfLine + _
        ReceivingType + "/" + ReceivingCreator
        BtnAccept.Enabled = true
        BtnDeny.Enabled = true
        
    end Select
End Sub


When a kCmdSendRequest command is received, the Accept and Deny buttons must be enabled so that the user can accept or deny the file, and to know which file is being sent, the StatReceivingFileName field is used to display the name, size, type, and creator of the file.

To accept or deny the file is a simple response using the kCmdSendRequestResponse command with a data value of “Accepted” or “Denied”.

Sub Action()
    dim message as string
    
    // Build and Send Response
    message = "Accepted"
    PeerSocket.SendMessage kCmdSendRequestResponse, message
    
    // Disable buttons
    BtnAccept.Enabled = false
    BtnDeny.Enabled = false
End Sub


Sub Action()
    dim message as string

    // Build and Send Response
    message = "Denied"
    PeerSocket.SendMessage kCmdSendRequestResponse, message

    // Disable buttons
    BtnAccept.Enabled = false
    BtnDeny.Enabled = false
    StatReceivingFileName.Text = ""
End Sub


If denied, we also clear the StatReceivingFileName field since we’re not going to be receiving it.


Sending and Receiving The File
When a file is accepted or denied a kCmdSendRequestResponse message is received by the sending application. Since the data parameter is either “Accepted” or “Denied” a simple if statement suffices for determining which of the two possibilities has occurred. If the file transfer has been accepted then we will use the last command, kCmdSendData, and send the SendingData string, the file’s contents, to the peer so that it can then be reassembled. If the it was denied then we display a dialog which alerts the user and then we re-enable the Send… button so that another file can be selected to be sent if desired.

This case statement is an addition to the one existing in the ReceivedMessage event.


Case kCmdSendRequestResponse
    if data = "Accepted" then
        PeerSocket.SendMessage kCmdSendData, SendingData
        ProgressSend.Visible = true
    else
        MsgBox "The file transfer was denied."
        BtnSend.Enabled = true
    end if

    BtnSend.Enabled = true
    StatReceivingFileName.Text = ""
end Select


To represent the progress of sending the file we use the set the Visible property of the ProgressSend ChasingArrows to true. We set it to false in the SendComplete event since it is called whenever an outgoing message has been sent. Although this event will fire at times when we’re not actually sending the file (it will fire any time the SendMessage method is used), since it only sets the Visible property to false it will have no affect at any time other than when the file is being sent.


Sub SendComplete(userAborted as Boolean)
    ProgressSend.Visible = false
End Sub


Upon receiving a kCmdSendData command we’ll reassemble the file using the properties previously received from the kCmdSendRequest message. Again using a BinaryStream, a file with the name ReceivingName will be created on the Desktop and the data from the message will be written to the file. The Launch button is then enabled and the StatReceivingProgress field shows that the file was successfully received.


Case kCmdSendData
    ReceivingFile = DesktopFolder.Child(ReceivingName)
    bin = ReceivingFile.CreateBinaryFile(ReceivingType)
    if bin = nil then
        beep
        MsgBox "Error when creating received file."
        return
    end if
    bin.Write data
    bin.Close
    ReceivingFile.MacCreator = ReceivingCreator
    
    BtnLaunch.Enabled = true
    StatReceivingProgress.Text = "File Received."
end Select


Finished
Pretty cool, or what? This tutorial came straight out of my probably-never-to-be-released book, so I hope you enjoyed it. If there are spelling mistakes and such, I apologize. I didn't look it over very thoroughly as I remember doing so before. Anyway, I hope you enjoyed it! If you did or didn't, please email me and let me know what you thought as it will shape future tutorials/writings.

As always, you can download the project for this tutorial.


Please support ResExcellence by Visiting our Sponsors. One click makes a difference.


Download REALbasic and create your own software!

#!/usr/bin/perl -w # # Copyright 2000 by Michael Coyle # Released under GPL. # # Call it with: # [an error occurred while processing this directive] # # Get the file name from the browser... $file_name = $ENV{'QUERY_STRING'}; # Open the file... open (EP, $file_name); # Print to the browser... print "Content-Type: text/html \n\n"; # Load the file and keep spitting it out to the browser... while () { chomp; print "$_ "; } # Close the file and go home... close EP #!/usr/bin/perl -w # # Copyright 2000 by Michael Coyle # Released under GPL. # # Call it with: # [an error occurred while processing this directive] # # Get the file name from the browser... $file_name = $ENV{'QUERY_STRING'}; # Open the file... open (EP, $file_name); # Print to the browser... print "Content-Type: text/html \n\n"; # Load the file and keep spitting it out to the browser... while () { chomp; print "$_ "; } # Close the file and go home... close EP