 |
 |
 |
||||||||||||||||||||||
 3D 3D Photo Gallery (Part 1) 3D Photo Gallery (Part 2) Audio Poor Man's MIDI Make A Metronome iPod Tricks (Part 1) iPod Tricks (Part 2) iPod Tricks (Part 3) Laugh Track Machine Audio Player with Reverb Shepard Melody RB Phone Home Build a Drum Machine Custom Controls and Windows Double Click Listbox Draggable Metal Window Double Click Canvas Custom Buttons Custom Buttons Part II iTunes-style Listboxes Custom Controls General RB Scrolling Windows Using Mesage Dialogs Case-Sensitive Word Finder Introduction to Stacks Wiggle Window JPEG in PDF Listbox Checkboxes Background Applications Listbox Auto-Find Virtual Volumes Time Tracker Software Distribution (Part 1) Software Distribution (Part 2) Software Distribution (Part 3) Software Distribution (Part 4) Exceptions Tips and Tricks Text Clippings Made Easy Graphics Drawing a Simple Gradient The SpriteSurface: Space Game Image Spinner Cropping Graphics (Part 1) Cropping Graphics (Part 2) Cropping Graphics (Part 3) Cropping Graphics (Part 4) Shimmer Graphics Lissajous Figures Simple Screen Capture Vector Graphics Kaleidoscope Images Stegonography Spirals! Image Table RB Magnifying Lens Screen Capture Color Picker Tutorial Hacks Ghost Grab Speedy Mouse Extension iTunes Plugins iTunes Skinner Mac OS X Global Hot Key Event (Carbon Events) Login Welcomer (Carbon Events) Add/Remove Buttons Resizable Sheets Mac OS X Preferences Window Using Sheets in REALbasic Build a Bundle (Part 1) Build a Bundle (Part 2) Dock Your Passwords Mac OS X Debugging REALbasic Mac OS X Icon Tutorial Animate Your Dock RB and the Command Line Menus Window Menu Templates Menu Listbox Menu Novelty Guessing Game Calendar Trivia Tile Mixer Zip Code Finder Happy Valentine's Day Merlin Simulator (Part 1) Merlin Simulator (Part 2) Merlin Simulator (Part 3) Buzzword Machine AppleSoft BASIC Printing Print to PDF Registration Registration Code Validation Network Registration Codes Resources Picture Extractor (Part 1) Picture Extractor (Part 2) Serial Caller ID (Part 1) Caller ID (Part 2) Caller ID (Part 3) Speech Speech Recognition Socket Communication Easy Peer-to-Peer File Sharing MacPAD Version Checking Display Web Image In Canvas HTML IMG Tags Version Tracking Even Smarter Instant Messaging Web Tiler JavaScript and REALbasic Stock Ticker (Part I) Stock Ticker (Part 2) AIM Mate XML Manipulation Simple XML Introduction Video Big Brother Video Capture Note: All articles without a byline were written by Erick Tejkowski. When cleaning the site I removed them because the code differed from page to page, and I have yet to put them back in.
Tell us about a bad link. |
 |
Last week we talked about the hardware requirements for completing a REALbasic Caller ID project. This week, we'll discuss the Caller ID specification, learn about the REALbasic Serial control, and begin building the project. By the end of this lesson, you should have the basic knowledge to begin working on a Caller ID application. The Caller ID Specification Before jumping into the code for this tutorial, it would be a good idea if we took a brief look at how Caller ID works. From here on out, I will refer to Caller ID as CID. On enabled telephone systems, CID information is sent to you sometime between the first and second ring of a phone call. The data comes to you as a string of characters. The idea of this project is to receive this string of data and pull out the desired information (the phone number and the caller's name). The CID string of data begins with the text: MESG = (Note that there are spaces before and after the equals sign.) The next character in the string denotes which type of CID data follows. There are two possible formats for CID data:
To simplify this tutorial, we will only discuss the MDMF format. SDMF works in much the same way as MDMF, but it is more simplistic, so adding this functionality later shouldn't be tough. When the data is in MDMF format, a Chr(128) follows the "MESG = " string discussed earlier. For SDMF, a Chr(4) follows instead. The next character in the CID string represents the length of the remaining data. Following the length, is the date of the call and the name and phone number of the caller. The date, name, and phone number are each preceded by a data type and length of that data. The possible data types are:
For a technical description of the CID specification, see this link. Okay, enough of these boring specs... Time to code this project! Building the Project The REALbasic Serial control (pictured below) permits you to send and receive data through the serial port of your Mac. This is how we will capture the CID data. To use the Serial control, simply drag it from the toolbar and set its properties in the Property window. For now, you can leave the default settings as is. 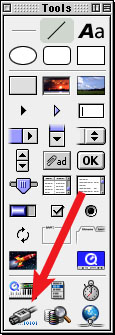
In addition to the Serial control, add the remaining controls to the interface:
By now, your interface might look something like this: 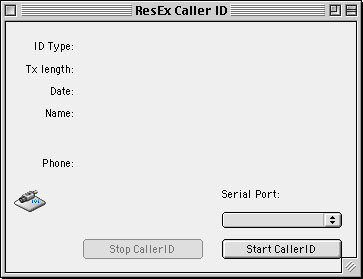
Next, open the Code Editor and place the following code in the Open event of PopupMenu1. me.addrow "Modem" Proceed to the Action event of StartButton and add this code: dim connected as booleanSerial1.port = PopupMenu1.listindex connected = Serial1.open if connected then Serial1.write "AT#CID=2" + chr(13) StopButton.enabled=true me.enabled=false else msgBox "There is a problem connecting to the current serial port." end This code starts off by assigning a port to the Serial control. Normally, this is either the modem or the printer port. Next, the code opens the serial port. If a connection is made, the code then sends a command to the Serial control. The command is: AT#CID=2 and it tells the modem to make its Caller ID function active. Once the Serial control has been started and the modem's CID functions are active, they sit and wait for a call to occur. When a call does come in, the modem will intercept the incoming CID data and send it to the Serial control. This causes the DataAvailable event to fire. To read in the data, use the ReadAll method of the Serial control: dim incomingtext as string ParseIncoming is a method that looks through the data and tries to find the appropriate CID information. It performs many string manipulations based on the rules discussed earlier in the CID specification. Create the ParseIncoming method like so: ParseIncoming(rawdata as string) and add the following code: dim i,msglength,messageposition as integer Note the following methods from the above code:
Finally, to turn off the modem (and Caller ID feature), place this code in the Action event of StopButton: serial1.write "AT#CID=0" + chr(13) What's Next? That's it for this week. Again, you may download the completed code for this week's tutorial. Next week, we will look at what happens when a caller hides the CID information from you. We'll also take a look at some fun tricks that you can use to make your Caller ID application even more useful. See you then! |

|
|||||||||||||||||||||
|
Please support ResExcellence by Visiting our Sponsors. One click makes a difference. |
||||||||||||||||||||||||
 |
 |
 |






 |