 |
 |
 |
||||||||||||||||||||||||||||||||||||||||||||||||||||||||||||||||||
 3D 3D Photo Gallery (Part 1) 3D Photo Gallery (Part 2) Audio Poor Man's MIDI Make A Metronome iPod Tricks (Part 1) iPod Tricks (Part 2) iPod Tricks (Part 3) Laugh Track Machine Audio Player with Reverb Shepard Melody RB Phone Home Build a Drum Machine Custom Controls and Windows Double Click Listbox Draggable Metal Window Double Click Canvas Custom Buttons Custom Buttons Part II iTunes-style Listboxes Custom Controls General RB Scrolling Windows Using Mesage Dialogs Case-Sensitive Word Finder Introduction to Stacks Wiggle Window JPEG in PDF Listbox Checkboxes Background Applications Listbox Auto-Find Virtual Volumes Time Tracker Software Distribution (Part 1) Software Distribution (Part 2) Software Distribution (Part 3) Software Distribution (Part 4) Exceptions Tips and Tricks Text Clippings Made Easy Graphics Drawing a Simple Gradient The SpriteSurface: Space Game Image Spinner Cropping Graphics (Part 1) Cropping Graphics (Part 2) Cropping Graphics (Part 3) Cropping Graphics (Part 4) Shimmer Graphics Lissajous Figures Simple Screen Capture Vector Graphics Kaleidoscope Images Stegonography Spirals! Image Table RB Magnifying Lens Screen Capture Color Picker Tutorial Hacks Ghost Grab Speedy Mouse Extension iTunes Plugins iTunes Skinner Mac OS X Global Hot Key Event (Carbon Events) Login Welcomer (Carbon Events) Add/Remove Buttons Resizable Sheets Mac OS X Preferences Window Using Sheets in REALbasic Build a Bundle (Part 1) Build a Bundle (Part 2) Dock Your Passwords Mac OS X Debugging REALbasic Mac OS X Icon Tutorial Animate Your Dock RB and the Command Line Menus Window Menu Templates Menu Listbox Menu Novelty Guessing Game Calendar Trivia Tile Mixer Zip Code Finder Happy Valentine's Day Merlin Simulator (Part 1) Merlin Simulator (Part 2) Merlin Simulator (Part 3) Buzzword Machine AppleSoft BASIC Printing Print to PDF Registration Registration Code Validation Network Registration Codes Resources Picture Extractor (Part 1) Picture Extractor (Part 2) Serial Caller ID (Part 1) Caller ID (Part 2) Caller ID (Part 3) Speech Speech Recognition Socket Communication Easy Peer-to-Peer File Sharing MacPAD Version Checking Display Web Image In Canvas HTML IMG Tags Version Tracking Even Smarter Instant Messaging Web Tiler JavaScript and REALbasic Stock Ticker (Part I) Stock Ticker (Part 2) AIM Mate XML Manipulation Simple XML Introduction Video Big Brother Video Capture Note: All articles without a byline were written by Erick Tejkowski. When cleaning the site I removed them because the code differed from page to page, and I have yet to put them back in.
Tell us about a bad link. |
 |
This week we continue with the third (and final) installment of the ResExcellence Caller ID tutorial. In the past two weeks, we discussed how to:
This week, we will look at how "private" and "out-of-area" calls are handled by CID. We will also improve the project by adding new features such as speech notification and database storage. The Caller ID Specification - Continued In previous installments, we saw that CID data gets sent as a string of characters through the modem. We focused on CID data in the MDMF format, which has a sequence like this:
In case you are wondering what all of those dollar signs are about, they tell you that the number is in hex format. It's never a bad idea to have a hex converter on hand when programming. In the above table $xx denotes a hex number that will be different for each call. xxxx represents a string of characters that will differ for each call. The above table demonstrates how CID data arrives on my particular CID. Your data may differ. For example, you may find that order of the name and phone number data are switched. This is due to the fact that the spec does not necessarily specify an order for parameters. Since each segment of the message is preceded by a parameter type code number (i.e. date, name, or phone #), your software could accept the data in any order based on that parameter code number. We won't go into how to do that here. Just be aware that it is a real possibility depending on how the data is sent to your home. If you live in another country, none of this code may work at all. Check around on the web to see if you can discover what format is in use for your particular country. Until now, we have always assumed that CID data (the name and phone number) would be sent to our application. But, sometimes this is not exactly the case. For example, if the caller presses *67 before calling you, the phone call will be classified as "Private" and the letter "P" will be sent in place of the caller's name and phone number. In other instances, the caller may live too far away for the data to make it all the way to your phone. When this happens, the call is designated "Out of Area" and the letter "O" is sent in place of the name and phone number. Fortunately, Private and Out-of-Area calls don't change the CID data stream much. The following table lists the order of CID data when the name and phone number are missing. Differences from the previous table appear in italics.
To help you visualize this better, a screenshot of CID data from a *67 phone call: 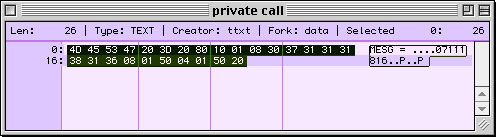
The Code If all of these specifications are making you crazy, you'll be happy to know that you won't need to change any code from last week to implement the Private and Out-of-Area phone calls. Still, it is good for you to know how the Caller ID data stream is organized, should you want to modify the code yourself later. Instead of adding boring CID parsing code, we will focus on improvements to the Caller ID project. When you receive a call and parse the incoming data, you are free to do anything you want with it. Once you see a few of these ideas, you will begin to understand why a Mac-based Caller ID is much more svelte than a traditional CID box. For starters, speech is a handy function that is easy to add to your Caller ID project. Imagine having your application speak the caller's number, or better yet, an interesting phrase, depending on who the caller is. I'm sure you can come up with many fun ideas for this feature. To add speech, open the CallerID window and create a new Method. Name the method SpeakText, and enter thetext as string in the Parameters field. In this new method, add the following code: dim i as integerDeclare Function SpeakString lib "SpeechLib" (SpeakString as pstring) as Integer i=SpeakString(thetext) As you might imagine, this code will speak any text you pass to it. To incorporate it into your Caller ID, add the following code to end of the ParseIncoming method: SpeakText(labelphone.text)Another benefit of using your computer is the fact that you can store your Caller ID history for days, weeks, months, and years at a time. Most hardware CID boxes permit storage of no more than a few dozen names. I have added a low-tech database to the Caller ID project, which can you download at the end of this tutorial. In the example, any new calls are added to a Listbox. That data can then be saved to a text file. Of course, you could choose a more high-tech approach. You might consider storing your CID info in a database. With REALbasic, there are many choices.
Hopefully some of these ideas have sparked your imagination. There are many interesting uses for this project. For instance, it would not be difficult to add the ability to:
Download As usual, you can Next week, I will be writing to you from the MacWorld Expo in New York. I will be signing books at the REALSoftware booth, so stop by and say "Hi" if you are in the neighborhood. See you then! |

|
|||||||||||||||||||||||||||||||||||||||||||||||||||||||||||||||||
|
Please support ResExcellence by Visiting our Sponsors. One click makes a difference. |
||||||||||||||||||||||||||||||||||||||||||||||||||||||||||||||||||||
 |
 |
 |






 |