 |
 |
 |
||||
 3D 3D Photo Gallery (Part 1) 3D Photo Gallery (Part 2) Audio Poor Man's MIDI Make A Metronome iPod Tricks (Part 1) iPod Tricks (Part 2) iPod Tricks (Part 3) Laugh Track Machine Audio Player with Reverb Shepard Melody RB Phone Home Build a Drum Machine Custom Controls and Windows Double Click Listbox Draggable Metal Window Double Click Canvas Custom Buttons Custom Buttons Part II iTunes-style Listboxes Custom Controls General RB Scrolling Windows Using Mesage Dialogs Case-Sensitive Word Finder Introduction to Stacks Wiggle Window JPEG in PDF Listbox Checkboxes Background Applications Listbox Auto-Find Virtual Volumes Time Tracker Software Distribution (Part 1) Software Distribution (Part 2) Software Distribution (Part 3) Software Distribution (Part 4) Exceptions Tips and Tricks Text Clippings Made Easy Graphics Drawing a Simple Gradient The SpriteSurface: Space Game Image Spinner Cropping Graphics (Part 1) Cropping Graphics (Part 2) Cropping Graphics (Part 3) Cropping Graphics (Part 4) Shimmer Graphics Lissajous Figures Simple Screen Capture Vector Graphics Kaleidoscope Images Stegonography Spirals! Image Table RB Magnifying Lens Screen Capture Color Picker Tutorial Hacks Ghost Grab Speedy Mouse Extension iTunes Plugins iTunes Skinner Mac OS X Global Hot Key Event (Carbon Events) Login Welcomer (Carbon Events) Add/Remove Buttons Resizable Sheets Mac OS X Preferences Window Using Sheets in REALbasic Build a Bundle (Part 1) Build a Bundle (Part 2) Dock Your Passwords Mac OS X Debugging REALbasic Mac OS X Icon Tutorial Animate Your Dock RB and the Command Line Menus Window Menu Templates Menu Listbox Menu Novelty Guessing Game Calendar Trivia Tile Mixer Zip Code Finder Happy Valentine's Day Merlin Simulator (Part 1) Merlin Simulator (Part 2) Merlin Simulator (Part 3) Buzzword Machine AppleSoft BASIC Printing Print to PDF Registration Registration Code Validation Network Registration Codes Resources Picture Extractor (Part 1) Picture Extractor (Part 2) Serial Caller ID (Part 1) Caller ID (Part 2) Caller ID (Part 3) Speech Speech Recognition Socket Communication Easy Peer-to-Peer File Sharing MacPAD Version Checking Display Web Image In Canvas HTML IMG Tags Version Tracking Even Smarter Instant Messaging Web Tiler JavaScript and REALbasic Stock Ticker (Part I) Stock Ticker (Part 2) AIM Mate XML Manipulation Simple XML Introduction Video Big Brother Video Capture Note: All articles without a byline were written by Erick Tejkowski. When cleaning the site I removed them because the code differed from page to page, and I have yet to put them back in.
Tell us about a bad link. |
 |
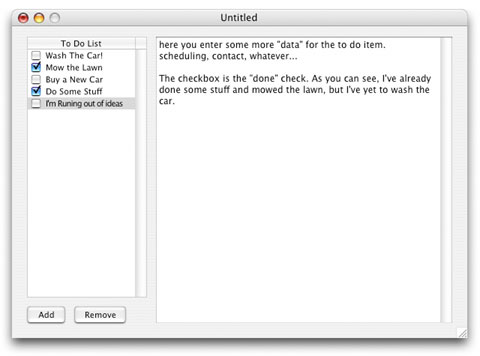
XML is Lovely The project is self is far too big to cover entirely in this tutorial and most of it is specific to the application itself rather than the XML, so we're going to skip everything except for explaining what the app is, the document's class structure, how to save the document into an XML file, and load it from an XML file. The To-Do List Application
So aside from the code which handles all of the interface (it's kinda neat, I'd check it out too), there are simply two methods in the window which read and write the list from an XML file called ReadToDoList and WriteToDoList. These are the two methods we'll be working with.
The WriteToDoList Method The way that the XML classes in REALbasic work, is that there's one root class, XMLDocument, that represents the file and each <tag></tag> is referred to as an element, but also a node. A node can also be the text between tags. For example, in: <name>Seth</name>, the <name></name> is a node and element which contains a single child node "Seth" which is not an element. In the case of <name><first>Seth</first><last>Willits</last></name>, name, first, and last, are nodes, Seth and Willits are nodes, but only name, first, and last are elements. Make sense? The main <todolist> tag could be referred to as the root node, but there is no actual distinction between nodes in code.
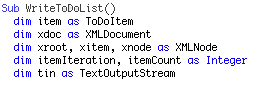
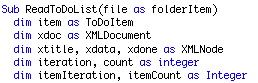
So looking at our variables, we're going to need and item as ToDoItem which will represent the current item that we're writing to the file, xdoc as XMLDocument which is the xml document, xroot, xitem, xnode as XMLNode which will be the nodes for the root, the item, and xnode will be used three times for each item, representing the title, data, and done of the item. We also need some integers to handle our looping, itemIteration, itemCount as integer, and tin as TextOutputStream so we can write the XML to a file.
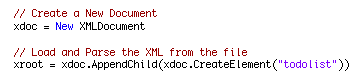
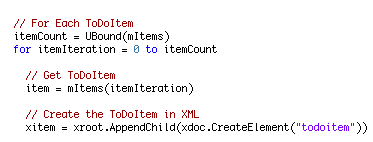
First we create a new document, and then we create and add our root node, todolist. Typically when we create objects and add them to something, we do it in two steps on two lines of code, but the XML classes shorten it to one line which is kinda handy. In the last line above you can see that we're creating a new "Element" (since it will contain other XML tags, not text), appending it to the document, and assigning it to xroot all in one step. Pretty cool. Basically, once you get a node, you append all child nodes to it and they automatically are inserted into the document as long as the node you're appending to is in the document.
Ok, next is the beginning of the loop in which we create the nodes for each ToDoItem. We get the number of ToDoItems and loop through each one, get the item from the array into a local variable for quick-n-easy acess, and then we create an XML node for it. Note that we still create a node using the XMLDocument instance, but we always append it to the XMLNode instance that will contain it.
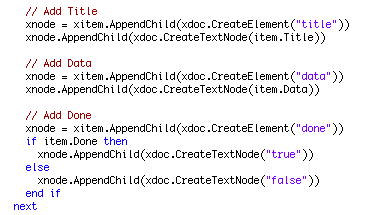
Once we've got the xitem node for the ToDoItem, we just use xnode to create three separate nodes which represent the title, data, and done of the item. Here we introduce a new method, CreateTextNode which creates a plain text node that is placed between it's parent's tags. For title, the text node created by xdoc.CreateTextNode(item.Title) would appear between the "title" elements tags: <title>this is a text node</title>. For the Done property, we had to interpret whether the boolean was true or false and write a string to the file. Later we'll do the reverse and turn it into a boolean when we read the file.
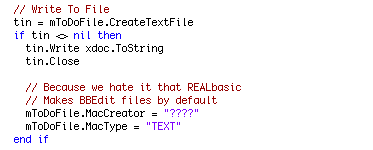
Here we simply write the XML data to a file by using the xdoc.ToString method.
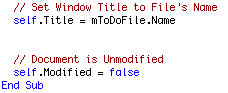
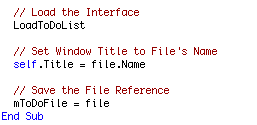
And this is just random stuff that makes the application behave properly, we're not really interested in it. So that's the WriteToDoList method. If you open the application and fiddle with it, then save, you'd get an XML file!
The ReadToDoList Method
The variables here are the same as the variables in the write method except note that we have an additional pair of integers for looping.
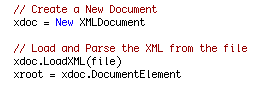
Again, we start off by creating an XMLDocument, and then we use the LoadXML method, passing a folderitem to it, which will load the file and create the hierarchy of nodes in REALbasic. We're then going to iterate through these nodes to find what we want. We first start off by getting our xroot, which is done by the last line above. The DocumentElement returns the root node of the xml file.
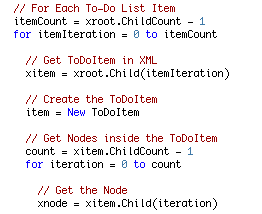
Here we loop through the number of child nodes in the xroot node. Remember that xroot is our <todolist> element and it contains any number of <todoitem> elements. The ChildCount of xroot is the 1-based number of how many <todoitem>s are in the file. Inside the loop we get the node into our xitem node. (It's easy to relate this to navigating a file system with folderitems actually. It's the same principle; count how many files/folders are in this folder, look at each one and do something about it.) After we get the xitem we create the ToDoItem instance which we'll later append to the mItems() array in our window. From there, we loop through the child nodes of the xitem node. The reason we're going to loop through rather than look for them specifically using item.Child(0) or something is because the nodes in the item don't have to be in the same order and additionally they're not required. Now, yes, the Write method will always write them in the same order, and will always write one no matter what, but if another application can open your files it might reorder them or maybe the user will go in by hand. Basically this is just a protection.
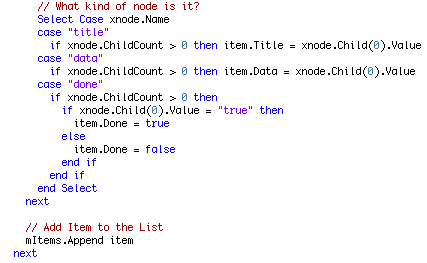
When we loop through the children of the xitem, we use a Select statement with the Name of the node which will be either title, data, or done. Based on which of those it is, we handle reading that node's children differently. We particularly want to make sure that we don't access a nonexistent node. In the case that the user doesn't save any data for a ToDoItem, the xml file will contain <data\> as the element, not <data></data>. As you can see, it's not possible for <data\> to contain any children, so we can't access the value for <data> buy retrieving xnode.Child(0).Value. Instead we'll be greated with an exception. So to prevent this, we first always check if the node has the child we're looking for which in our case we can do with a simple xnode.ChildCount > 0.
This also is just interface mumbo jumbo for the application that we won't bother getting into.
Final Notes As always, you can download the project for this tutorial. |

|
|||
|
Please support ResExcellence by Visiting our Sponsors. One click makes a difference. |
||||||
 |
 |
 |





 |