 |
 |
 |
||||||||||||||||||||||||
 3D 3D Photo Gallery (Part 1) 3D Photo Gallery (Part 2) Audio Poor Man's MIDI Make A Metronome iPod Tricks (Part 1) iPod Tricks (Part 2) iPod Tricks (Part 3) Laugh Track Machine Audio Player with Reverb Shepard Melody RB Phone Home Build a Drum Machine Custom Controls and Windows Double Click Listbox Draggable Metal Window Double Click Canvas Custom Buttons Custom Buttons Part II iTunes-style Listboxes Custom Controls General RB Scrolling Windows Using Mesage Dialogs Case-Sensitive Word Finder Introduction to Stacks Wiggle Window JPEG in PDF Listbox Checkboxes Background Applications Listbox Auto-Find Virtual Volumes Time Tracker Software Distribution (Part 1) Software Distribution (Part 2) Software Distribution (Part 3) Software Distribution (Part 4) Exceptions Tips and Tricks Text Clippings Made Easy Graphics Drawing a Simple Gradient The SpriteSurface: Space Game Image Spinner Cropping Graphics (Part 1) Cropping Graphics (Part 2) Cropping Graphics (Part 3) Cropping Graphics (Part 4) Shimmer Graphics Lissajous Figures Simple Screen Capture Vector Graphics Kaleidoscope Images Stegonography Spirals! Image Table RB Magnifying Lens Screen Capture Color Picker Tutorial Hacks Ghost Grab Speedy Mouse Extension iTunes Plugins iTunes Skinner Mac OS X Global Hot Key Event (Carbon Events) Login Welcomer (Carbon Events) Add/Remove Buttons Resizable Sheets Mac OS X Preferences Window Using Sheets in REALbasic Build a Bundle (Part 1) Build a Bundle (Part 2) Dock Your Passwords Mac OS X Debugging REALbasic Mac OS X Icon Tutorial Animate Your Dock RB and the Command Line Menus Window Menu Templates Menu Listbox Menu Novelty Guessing Game Calendar Trivia Tile Mixer Zip Code Finder Happy Valentine's Day Merlin Simulator (Part 1) Merlin Simulator (Part 2) Merlin Simulator (Part 3) Buzzword Machine AppleSoft BASIC Printing Print to PDF Registration Registration Code Validation Network Registration Codes Resources Picture Extractor (Part 1) Picture Extractor (Part 2) Serial Caller ID (Part 1) Caller ID (Part 2) Caller ID (Part 3) Speech Speech Recognition Socket Communication Easy Peer-to-Peer File Sharing MacPAD Version Checking Display Web Image In Canvas HTML IMG Tags Version Tracking Even Smarter Instant Messaging Web Tiler JavaScript and REALbasic Stock Ticker (Part I) Stock Ticker (Part 2) AIM Mate XML Manipulation Simple XML Introduction Video Big Brother Video Capture Note: All articles without a byline were written by Erick Tejkowski. When cleaning the site I removed them because the code differed from page to page, and I have yet to put them back in.
Tell us about a bad link. |
 |
After hearing from a few Apple ][ diehards, it occurred to me that some REALbasic newbies might be making the transition to REALbasic from Apple BASIC. Many folks started their programming careers using the venerable Applesoft BASIC on the various models of the Apple ][ (yours truly included). In their honor, this week we will build a simple Applesoft BASIC simulator, which will allow you to enter and "run" graphics commands from the Applesoft BASIC language. Hang on to your seats as we set the time traveler to 1980... Preparation Ok, here we are in 1980 staring at the TV screen of our fancy Apple ][ machine. Each Apple machine at the time came with a copy of Applesoft BASIC, a BASIC intrepreter. One of the first things an Applesoft BASIC programmer learned to do was create low resolution graphics. They were lousy compared to today's standards, but they have a certain retro charm. Our project will simulate some of the low resolution graphics commands of the Applesoft BASIC language.
Low resolution Applesoft BASIC graphics have a coordinate system much like REALbasic with the origin (0,0) at the top left. Unlike REALbasic, the dimensions of the screen are 40 columns wide by 48 columns high. Look here if you would like to learn more about the Applesoft BASIC commands. Build the Interface Launch REALbasic and open the default window, Window1. From the toolbar, add the following controls to the interface:
Feel free to experiment with the layout, but it might look something like this: 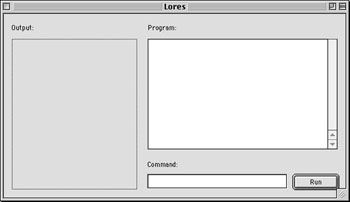
Add the Code Double click any control to open the Code Editor. Before adding any code, though, select Edit->NewProperty and create the following two Properties: 
To begin the coding, navigate to the Open event of Window1 and enter the following code: 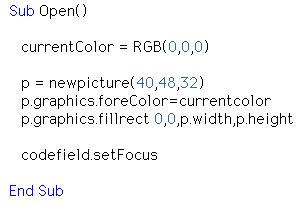
This code initializes the color to black (the same as on an Apple ][) and creates a picture object. The picture, p is where we will draw the graphics for each command. Notice that it is very small (only 40x48 pixels). We will stretch this picture over a larger (but similarly shaped) Canvas to display it to the user. Since this is low resolution graphics, it doesn't matter that we lose resolution. Next, open the Paint event of the tvscreen Canvas and enter this code: 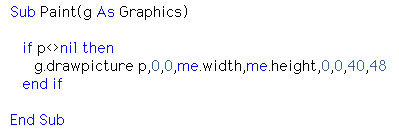
You might guess that this code "stretches" (called scaling in graphics lingo) the picture p over the Canvas. Select Edit->New Method to add a new method named SetCurrentColor(colornumber as integer). We will pass this method a color number (between 0 and 15) and adjust the current color accordingly: 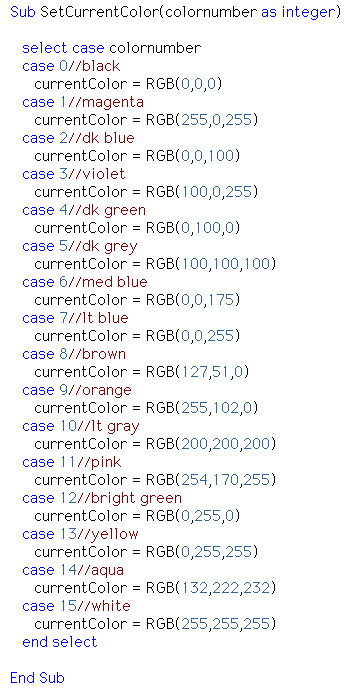
The final step in this code is to process the commands a user enters. The code is somehwat involved and takes up a lot of space on a web page. For this reason, I will briefly discuss it here, but not display it. To see it, you can download the completed project at the end of this tutorial. Each time a user enters a command and presses "Enter", we have to figure out which command it was and act appropriately. This occurs in the Action event of PushButton1. We start by looking for the "HOME" command, since it is only four letters long. If we find it, we fill in the picture p and exit the code. If the "HOME" command wasn't entered, then the user may have entered one of the other three commands: COLOR, HLIN, and VLIN. The remainder of the code determines which of these commands has been entered. If the COLOR command is entered, the SetCurrentColor method gets called. If the command is HLIN or VLIN, the code draws the appropriate sized line and refreshes the tvscreen Canvas. If, at any time, our code gets some garbage command or improper syntax, we warn the user that they have entered an invalid command. Conclusion 
This week you need to download the completed project to see all of the code. Go dig up that collection of old Byte magazines and scour them for low resolution graphics code. If you are feeling really daring, you might add some code that allows a user to save their work of art or the sequence of commands used in creating the picture. when you get finished playing with the code set your time machine back to 2001. See you next week! |

|
|||||||||||||||||||||||
|
Please support ResExcellence by Visiting our Sponsors. One click makes a difference. |
||||||||||||||||||||||||||
 |
 |
 |






 |