
Articles 3D Audio Custom Controls General RB Graphics Hacks Mac OS X Menus Novelty Printing REALbasic 2005 REALbasic 2006 Registration Resources Reviews Serial Speech Sockets XML Video Resource Links News Current News February 2006 January 2006 December 2005 November 2005 October 2005 September 2005 August 2005 July 2005 June 2005 May 2005 April 2005 March 2005  REALbasic for Dummies by Erick Tejkowski  Learning REALbasic through Applications REALbasic for Macintosh REALbasic Cross-Platform Application Development 
Older files are in Stuffit 5 or greater format. Newer files are ".Zip". Download StuffIt Expander |
|

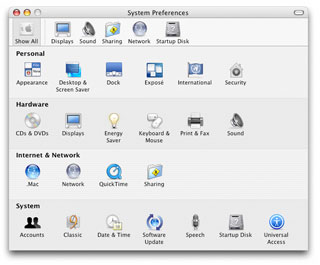
This idea has been spreading not only among Apple's programs, but also throughout third-party applications. Using this design for a preferences window in your application will certainly improve its image making a better impression on users, and is the reason we're going to make one in this tutorial. Design
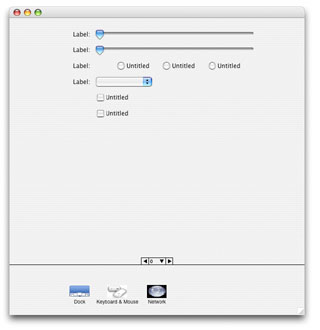
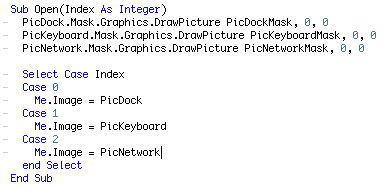
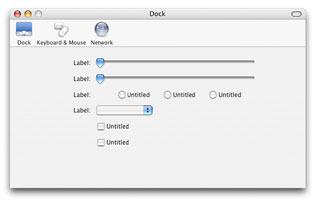
In the image above, you can see there is a large page panel filling most of the window, and then a small group of ToolbarItems at the bottom. Since the different preference panes will have varying height requirements, the PagePanel which holds the controls for the panes will need to be tall enough to accomadate the largest pane. When a ToolbarItem is clicked on, thus changing the current pane, the window will resize to be just large enough to show only that pane; Just like in System Preferences. Adding Controls to the Window Since the three preference panels we're going to make are Dock, Keyboard & Mouse, and Network, go ahead and set the Caption value of those three ToolbarItems to Dock, Keyboard && Mouse, and Network respectively. (Don't forget that double ampersands (&&) are required to make one appear.) Download the finished project and import the pictures into your project. Go ahead and set the image values for the ToolbarItems to PicDock, PicKeyboard, and PicNetwork. Since these images don't have a mask, we will reset the images in code, but we set these now because it makes it easier to see which ToolbarItem is which when we're working in the IDE. To give the pictures a mask, we'll draw the mask images into the PicDock, PicKeyboard, and PicNetwork images "Mask" properties, then reset the ToolbarItems Image property so the changes will take affect.
Window Resizing
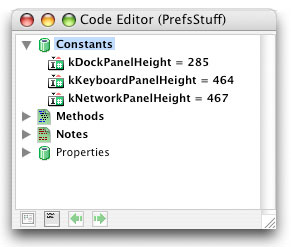
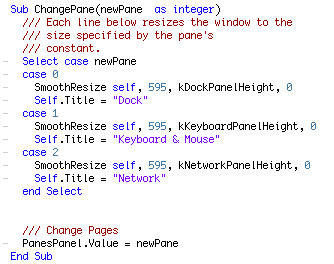
Changing Panes The first parameter of the SmoothResize method is the window which is being resized, the second is the new width of the window (which in our case is the same as the old width, 595), the third is the new height, and the last parameter specifies from which corner the window is being resized. See the SmoothResize method for more info.
And since when our window first opens it should open to one of the panes, we set the default pane in the main window's Open event by calling ChangePane 0.
When the user clicks on any one of the ToolbarItems, the PrefsTBItem's Action event fires which is where we then change the pane. Since the index value of the ToolbarItem in the PrefsTBItem control array is the same as the index of the pane's page in the PanesPanel, we can simply call ChangePane Index to change the preference pane.
The Finished Product
|
||||


|
||||||||||||||||||||||||||||||||
Maintained by the Staff of ResExcellence. This entire site ©1997-2006 ResExcellence
Privacy Statement? Sure we gotta Privacy Statement.
[an error occurred while processing this directive]