Description
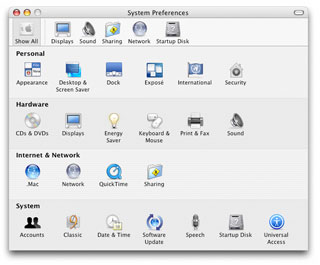
Mac OS X changed many of the ways programs are designed and created. The system-wide toolbar probably had the largest affect more than anything because of its versatility. Toolbars are used in the Finder and Safari for navigation and view manipulation, they're used in Mail to invoke certain actions such as deleting or creating a new document, and in System Preferences, toolbar items are used to select one of many preference panes so that we can change that panes settings.
This idea has been spreading not only among Apple's programs, but also throughout third-party applications. Using this design for a preferences window in your application will certainly improve its image making a better impression on users, and is the reason we're going to make one in this tutorial.
Design
There are really only two parts to creating a preferences window with this design. There are the toolbar items which are used to select from the panes, and then there are the preference panes themselves. Since we're going to want to switch between multiple panes in a single window, we'll use a PagePanel to hold the panes and multiple ToolbarItem controls to select the panes.
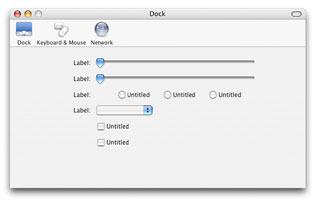
In the image above, you can see there is a large page panel filling most of the window, and then a small group of ToolbarItems at the bottom. Since the different preference panes will have varying height requirements, the PagePanel which holds the controls for the panes will need to be tall enough to accomadate the largest pane. When a ToolbarItem is clicked on, thus changing the current pane, the window will resize to be just large enough to show only that pane; Just like in System Preferences.
Adding Controls to the Window
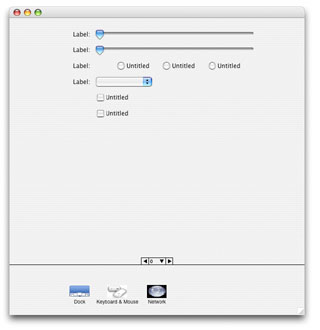
Start making the window for our project by creating a window that is 595 pixels wide and 600 pixels tall. The PagePanel inside of it should be named "PanesPanel", 597 pixels wide and 500 pixels tall, and positioned at Left: -1, and Top: -1. After that, make sure there are three pages in the PagePanel (0, 1, and 2) and add any controls you want to them. Then create three ToolbarItems naming them all "PrefsTBItem" and creating a control array out of them. Make sure that the leftmost ToolbarItem has an Index 0 and the rightmost Index 2. (You're going to want to keep them in the same order as they would appear at runtime.)
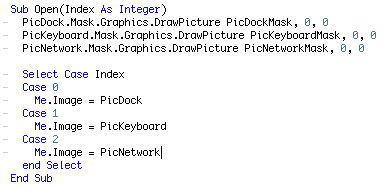
Since the three preference panels we're going to make are Dock, Keyboard & Mouse, and Network, go ahead and set the Caption value of those three ToolbarItems to Dock, Keyboard && Mouse, and Network respectively. (Don't forget that double ampersands (&&) are required to make one appear.) Download the finished project and import the pictures into your project. Go ahead and set the image values for the ToolbarItems to PicDock, PicKeyboard, and PicNetwork. Since these images don't have a mask, we will reset the images in code, but we set these now because it makes it easier to see which ToolbarItem is which when we're working in the IDE.
To give the pictures a mask, we'll draw the mask images into the PicDock, PicKeyboard, and PicNetwork images "Mask" properties, then reset the ToolbarItems Image property so the changes will take affect.
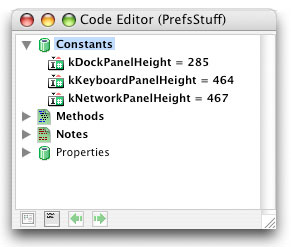
Window Resizing
As I said before, we need to know the heights of the individual preference panes so we can resize the window accordingly. To do this, create a new module named "PrefsStuff" and add the constants in the window below. In addition to knowing the heights of the panes, we'll need a way to resize the window. Now while we could simply use a single line of code like "Main.Height = kDockPanelHeight" that's not very fancy since the window is instantly resized. If you take a look at System Preferences, you'll notice that the window smoothly resizes. To do this, we'll use a method from the Carbon Declare Library called SmoothResize. The code for SmoothReisize is below. Add it to your PrefsStuff module.
Changing Panes
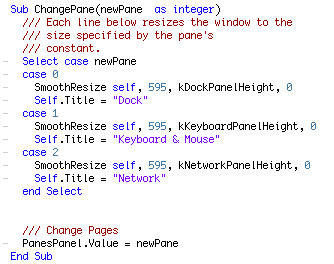
To change panes, we will create a new method in the Main window named "ChangePanes" which will accept a single parameter "newPane as integer" which will be the index value of the pane we're going to switch to. We first use the SmoothResize method with the appropriate constant for the pane's height to resize the window, set the window's title to that of the current preference pane, and then change the PanesPanel's value to show the new pane. Showing the pane (by changing the PanesPanel.Value) before the window is resized looks odd, which is the reason that we resize then show the new pane.
The first parameter of the SmoothResize method is the window which is being resized, the second is the new width of the window (which in our case is the same as the old width, 595), the third is the new height, and the last parameter specifies from which corner the window is being resized. See the SmoothResize method for more info.
And since when our window first opens it should open to one of the panes, we set the default pane in the main window's Open event by calling ChangePane 0.
![]()
When the user clicks on any one of the ToolbarItems, the PrefsTBItem's Action event fires which is where we then change the pane. Since the index value of the ToolbarItem in the PrefsTBItem control array is the same as the index of the pane's page in the PanesPanel, we can simply call ChangePane Index to change the preference pane.
![]()
The Finished Product
Below is the final result. Now we have a pretty cool looking and functioning preferences window! You can download the project here.