
Articles 3D Audio Custom Controls General RB Graphics Hacks Mac OS X Menus Novelty Printing REALbasic 2005 REALbasic 2006 Registration Resources Reviews Serial Speech Sockets XML Video Resource Links News Current News February 2006 January 2006 December 2005 November 2005 October 2005 September 2005 August 2005 July 2005 June 2005 May 2005 April 2005 March 2005  REALbasic for Dummies by Erick Tejkowski  Learning REALbasic through Applications REALbasic for Macintosh REALbasic Cross-Platform Application Development 
Older files are in Stuffit 5 or greater format. Newer files are ".Zip". Download StuffIt Expander |
|

If you'd like to follow along with this week's project, download a copy of last week's finished project and open it with REALbasic. You can also go back and read the original tutorial in case you missed it. Enhance the Interface
Next, double click Window1 to open its Code Editor. Scroll down to the Properties, and double-click iPods(0) as folderItem property to edit it. Make sure that the Private checkbox is NOT checked. This will give our Thread object (later in this tutorial) access to the array of iPod FolderItems. Finally, return to the Project Window and click on the File-New Class menu item. Name the new class "iPodThread" by editing its Name property and then change its Super property to "Thread" (ignore quotes for both Name and Super). Double-click the new Thread class to open its Code Editor. Choose Edit-New Property and create a new property named "caller as Window1". Again, uncheck the Private checkbox. Add the Code To create and run the thread, replace the Code in the Action event of PushButton2 with the following code:
In the Action event of PushButton3 enter the following code to copy the selected file on the iPod to the desktop.
Next, open the iPodThread class and add the following code to the Run event. If you're following along from last week, you'll recognize much of the code. Most of it is code that we used within the PushButton2 control last time. We've also added some feedback via the ProgressBar and StaticText control. Finally, we give the user the chance to cancel the operation by holding Escape or Cmd-Period. Another difference is that this time we are displaying each file name in the first column of the Listbox, and its path in the second column. Because we give the first column 100% of the Listbox width, you won't see the paths displayed. We effectively "hid" them. (They're long and messy anyway)
Conclusion |
||||

 Have you ever wondered how all those neat iPod utilities work? This week we'll continue our multi-week tutorial about using REALbasic to have some fun with your iPod. This week we'll show you how to copy files from a connected iPod. We'll also thread the search process, so the project doesn't lock up the machine.
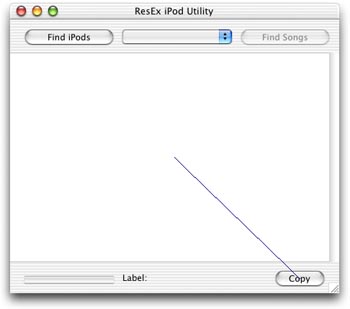
|
||||||||||||||||||||||||||||||||
Maintained by the Staff of ResExcellence. This entire site ©1997-2006 ResExcellence
Privacy Statement? Sure we gotta Privacy Statement.
[an error occurred while processing this directive]