 Have you ever wondered how all those neat iPod utilities work? This week we'll continue our multi-week tutorial about using REALbasic to have some fun with your iPod. This week we'll show you how to copy files from a connected iPod. We'll also thread the search process, so the project doesn't lock up the machine.
If you'd like to follow along with this week's project, download a copy of last week's finished project and open it with REALbasic. You can also go back and read the original tutorial in case you missed it.
Enhance the Interface
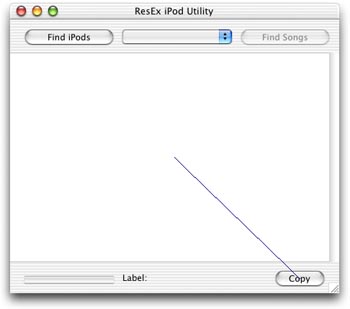
Open Window1 and add a PushButton, a ProgressBar, and a StaticText control to the interface. The new button will be used to trigger a copy operation from the iPod to your Mac. The ProgressBar and StaticText controls will be used to display information as the project searches for music files on the iPod. While you're staring at the interface, press and hold Cmd-Shift on your keyboard. Then, drag from the new PushButton to the Listbox control. When you let go of the mouse, a dialog appears allowing you to select a Control Binding operation. Select the only option and click "OK". This will cause the PushButton to become enabled when the Listbox has a selection. Otherwise, it remains disabled. Rearrange the interface however you like. I've left the default "Label:" text setting for the StaticText control so you can see its location. My interface looks like this:
Next, double click Window1 to open its Code Editor. Scroll down to the Properties, and double-click iPods(0) as folderItem property to edit it. Make sure that the Private checkbox is NOT checked. This will give our Thread object (later in this tutorial) access to the array of iPod FolderItems.
Finally, return to the Project Window and click on the File-New Class menu item. Name the new class "iPodThread" by editing its Name property and then change its Super property to "Thread" (ignore quotes for both Name and Super). Double-click the new Thread class to open its Code Editor. Choose Edit-New Property and create a new property named "caller as Window1". Again, uncheck the Private checkbox.
Add the Code
Last week we created some code to locate the music files on an iPod. The code was fairly simple, but it had one drawback. Because an iPod might have thousands of music files, it takes awhile to find them all. Furthermore, our code was inelegant. It used a "brute force" method that caused the application to overtake the CPU. A user can't do anything until the process is over. To remedy this problem, all you have to do is use a Thread (which you created earlier in this tutorial). Code that runs in a thread won't lock up the CPU. Instead, the user can continue to use the interface, switch applications, and everything else they expect to be able to do. You can also provide visual feedback in a thread a lot easier than you can in non-threaded code. The trade-off is that your threaded code will run a little slower. For long operations like this one, users will appreciate feedback. Another advantage of a thread is that you can easily permit the user to cancel.
To create and run the thread, replace the Code in the Action event of PushButton2 with the following code:
  dim t as iPodThread
  listBox1.columnCount=4
  listBox1.columnWidths = "100%"
  t=new iPodThread
  t.caller = self
  t.run
In the Action event of PushButton3 enter the following code to copy the selected file on the iPod to the desktop.
  dim dest,src as folderItem
  dest=DesktopFolder.child(ListBox1.cell(ListBox1.listindex,0))
  if dest<>nil then
    src = GetFolderItem(ListBox1.cell(ListBox1.listindex,1))
    if src<>nil and src.exists then
      src.copyFileTo dest
      MsgBox "File copied"
    end if
  end if
Next, open the iPodThread class and add the following code to the Run event. If you're following along from last week, you'll recognize much of the code. Most of it is code that we used within the PushButton2 control last time. We've also added some feedback via the ProgressBar and StaticText control. Finally, we give the user the chance to cancel the operation by holding Escape or Cmd-Period. Another difference is that this time we are displaying each file name in the first column of the Listbox, and its path in the second column. Because we give the first column 100% of the Listbox width, you won't see the paths displayed. We effectively "hid" them. (They're long and messy anyway)
  dim i,j as integer
  dim f as folderItem
  dim musicFolders(0) as folderItem
  dim max as integer

  caller.PushButton2.enabled=FALSE
  f = caller.iPods(caller.PopupMenu1.listindex + 1).child("iPod_Control").child("Music")
  if f<>nil then
    //find all folders in the hidden Music folder
    for i = 1 to f.count
      if f.item(i).directory then
        musicFolders.append f.item(i)
      end if
    next
    //set up the progressbar
    max=0
    for i = 1 to ubound(musicFolders)
      max=max+musicFolders(i).count
    next
    caller.progressBar1.maximum = max
    caller.progressBar1.value=0
    //now loop through each folder and grab the songs
    for i = 1 to ubound(musicFolders)
      for j = 1 to musicFolders(i).count
        caller.listBox1.addrow musicFolders(i).item(j).name
        caller.listBox1.cell(caller.listBox1.lastIndex,1)=musicFolders(i).item(j).absolutePath
        //update display
        caller.staticText1.text = musicFolders(i).item(j).name
        caller.progressBar1.value = caller.progressBar1.value+1
        //is the user trying to cancel the operation?
      next
      if userCancelled then
        caller.progressBar1.value = 0
        caller.staticText1.text = "Operation Aborted"
        //exit the loop
        exit
      end if
    next
  end if

  caller.progressBar1.value = 0
  caller.staticText1.text = "Operation Complete"
Conclusion
We're done! Choose Debug-Run to see your work. Don't forget to mount an iPod before you test it, otherwise this project won't do much. Your Mac doesn't have FireWire, but the one in the other room does? You can always share an iPod over the network just like any other hard drive. Download the code for this week's project here. See you next time!