Spreadsheet Class
Because we're going to want to be able to reuse this code/listbox, we're going to make it a subclass of Listbox. So with a new subclass, we're going to override the CellBackgroundPaint, CellClick, CellGotFocus, CellKeyDown, and CellTextPaint events. For each of these events we implement a "new" event and call it from the subclass so that the instances of the Spreadsheet class can use them.
Removing the Row Selection
Removing the row selection is done by overriding the CellBackgroundPaint and CellTextPaint events. To keep the selection from being drawn, we clear the graphics context in CellBackgroundPaint and return true to stop it from drawing. We have to additionally override CellTextPaint to turn the white text to black (because selected rows can turn their text to white depending on system settings).
Function CellBackgroundPaint(g As Graphics, row As Integer, column As Integer) As Boolean
g.ClearRect 0, 0, g.Width, g.Height
CellBackgroundPaint(g, row, column)
return true
End Function
Function CellTextPaint(g As Graphics, row As Integer, column As Integer, x as Integer, y as Integer) As Boolean
g.ForeColor = RGB(0, 0, 0)
return CellTextPaint(g, row, column, x, y)
End Function
Making the Click Work
Clicking on a cell in a spreadsheet immediately makes it editable. By default, editable cells (ColumnType or CellType being 3) only allow the user to edit the text after a double click rather than a single click since this is the standard behavior of a list. So what we're going to do is override CellClick to immediately call EditCell which makes the cell enter it's editing mode.
Function CellClick(row as Integer, column as Integer, x as Integer, y as Integer) As Boolean
EditCell row, column
return CellClick(row, column, x, y)
End Function
Selecting the Text on Click
Since we also want the text in the cell to be selected when it's clicked on, we use the CellGotFocus event to select the text in the cell. We use CellGotFocus rather than doing it in CellClick because if the user tabs or returns to travel between cells, using CellGotFocus handles that too as we'll see later.
Sub CellGotFocus(row as Integer, column as Integer)
ActiveCell.SelStart = 0
ActiveCell.SelLength = Len(ActiveCell.Text)
CellGotFocus(row, column)
End Sub
Traversing Cells and Select All
Last but not least, we add support for tabbing and returning between cells, and also add Select All support. Unfortunately, Select All can't be done using a menu handler, but it's really not a big deal. We can simply do this in the CellKeyDown event.
Function CellKeyDown(row as Integer, column as Integer, key as String) As Boolean
if key = "a" and Keyboard.AsyncCommandKey then
ActiveCell.SelStart = 0
ActiveCell.SelLength = Len(ActiveCell.Text)
return true
end if
if key = chr(13) then
if row + 1 < ListCount then
EditCell row + 1, column
else
if column + 1 < ColumnCount then
EditCell 0, column + 1
end if
end if
return true
end if
if key = chr(9) then
if column + 1 < ColumnCount then
EditCell row, column + 1
else
if row + 1 < ListCount then
EditCell row + 1, 0
end if
end if
return true
end if
return CellKeyDown(row, column, key)
End Function
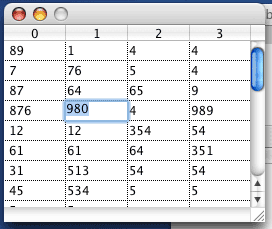
Finished
So there you have it. It's not a spreadsheet program, but it does make listboxes behave like spreadsheets. I think a spreadsheet would best be done as a custom class built on a Canvas, but that's a rather large project to undertake, so, oh what are the words... ah, that's left as an exercise to the reader. :-) As always, you can download the project here.