image ResEx Logo
ResExcellence www : Powered by Google
Cell Phone Themes Icons Mighty Mouse Cursors Software Reviews Widgets & Widgets

Articles
   3D
   Audio
   Custom Controls
   General RB
   Graphics
   Hacks
   Mac OS X
   Menus
   Novelty
   Printing
   REALbasic 2005
   REALbasic 2006
   Registration
   Resources
   Reviews
   Serial
   Speech
   Sockets
   XML
   Video
Resource Links
News
   Current News
   February 2006
   January 2006
   December 2005
   November 2005
   October 2005
   September 2005
   August 2005
   July 2005
   June 2005
   May 2005
   April 2005
   March 2005


REALbasic for Dummies
by Erick Tejkowski


Learning REALbasic through Applications
by Clayton E., Crooks II


REALbasic for Macintosh
by Michael Swaine


REALbasic Cross-Platform Application Development
by Mark S. Choate


Older files are in Stuffit 5 or greater format. Newer files are ".Zip". Download StuffIt Expander
Tell us about a bad link. Thank You!

Stegonography by Erick Tejkowsi
02-28-02

Printer Version


Stegonography is the discipline of hiding information in files. Today we will build a simple stegonography machine. With it you can hide a secret message within an image. Give the decoder to your friends or family and they can read your secret message.

Intro

If you would like to know more about the study of stegonography, the web has many resources about the topic. This introduction is a good start if this is a new topic to you. The basic idea behind stegonography is that you can hide data within various types of computer files. Since presumably no one is looking for this data in the place or manner you hid it, the data remains secret. Only those who know your method or who have a decoder can retrieve the information from its hiding place. To demostrate, we are going to hide a short message (<100 characters long) within a 100x100 image.

Build the Interface and Add the Code

Launch REALbasic, open Window1 and add the following items:

  • Canvas
  • PushButton - named "EncodeButton"
  • PushButton - named "DecodeButton"
  • EditField - LimitText = 99

Next create two properties, by selecting the Edit-NewProperty menu:

	p as Picture
	r as RGBSurface  

Navigate to the Paint event of Canvas1 and enter the following code

g.drawpicture p,0,0

Then, enter this code into the Open event of Window1.

  dim i,j as integer
  dim r as rgbSurface
  
  p=newpicture(100,100,32)
  r=p.rgbSurface
  
  for i=0 to 99
    for j=0 to 99
      r.Pixel(i,j) = rgb(rnd*255,rnd*255,rnd*255)
    next 
  next

Add this code to the Action event of the EncodeButton:

  dim i,n as integer
  dim s as string
  dim f as folderItem
  
  //the message
  s=editfield1.text 
  //length of the message
  n=len(editfield1.text)
  
  //write the length of the msg
  //in pixel (0,0)
  p.graphics.pixel(0,0) = rgb(n,n,n)
  
  for i=1 to n
    
    //find the ascii number of each
    //character in the message
    n = asc(mid(s,i,1))
    
    //set the red portion of
    //successive pixels to the ascii
    //value of that position's character
    p.graphics.pixel(i,0) = rgb(n,rnd*255,rnd*255)
    
  next
  
  //save the encoded picture message
  //as a PICT file.
  f = GetSaveFolderItem("image/x-pict","Encoded Image")
  if f<>nil then
    f.saveAsPicture(p)
  end if
  
  editfield1.text=""
  canvas1.refresh 
  

Finally, place this code in the Action event of the DecodeButton:

  dim i,n as integer
  dim s as string
  dim f as folderItem
  dim c as color
  dim pp as picture
  
  //save the encoded picture message
  //as a PICT file.
  f = GetOpenFolderItem("image/x-pict")
  if f<>nil then
    //open a picture
    pp = f.openAsPicture
    
    //draw this new picture
    //on the canvas
    p.graphics.drawpicture pp,0,0
    r=p.rgbSurface
    c = r.Pixel(0,0)
    canvas1.refresh 
    
    //find the red value
    //of the pixel (0,0)
    n = c.red
    
    editfield1.text=""
    for i=1 to n
      //loop thru the pixels in the top row
      //and build ascii characters based on
      //the red value of each pixel
      s = chr(r.pixel(i,0).red)
      editfield1.text = editfield1.text+s
    next
    
  end if


Conclusion

That's it! Select Debug-Run to test your work. Enter a message in the EditField and press the EncodeButton. You will be asked to save the resulting image to your hard drive. Later, press the DecodeButton to open the encoded image file and the decode the message within. Some important things to rememeber for this project:

  • Save the image in PICT format only. If you try to save the image in something like JPEG, you stand the chance of altering your hidden message. The PICT format will retain the color information, which is vital here.
  • There are many other ways to hide your message in the image. Try writing the message in diagonal lines through the image, by using every other pixel, or by manipulating color information. As you can see, the possibilities are limitless and devising a sophisticated design will only protect your data that much more.

The completed project might look something like this:

02-28-02_stego.jpg (31k)

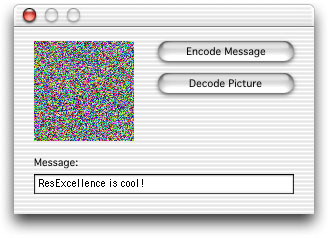
You can download the finished product here. See you next week!


Cell Phone Themes Icons Mighty Mouse Cursors Software Reviews Widgets & Widgets

Maintained by the Staff of ResExcellence. This entire site ©1997-2006 ResExcellence
Privacy Statement? Sure we gotta Privacy Statement. [an error occurred while processing this directive]