
Articles 3D Audio Custom Controls General RB Graphics Hacks Mac OS X Menus Novelty Printing REALbasic 2005 REALbasic 2006 Registration Resources Reviews Serial Speech Sockets XML Video Resource Links News Current News February 2006 January 2006 December 2005 November 2005 October 2005 September 2005 August 2005 July 2005 June 2005 May 2005 April 2005 March 2005  REALbasic for Dummies by Erick Tejkowski  Learning REALbasic through Applications REALbasic for Macintosh REALbasic Cross-Platform Application Development 
Older files are in Stuffit 5 or greater format. Newer files are ".Zip". Download StuffIt Expander |
|

Q: When is an image not an image? Background This week's project idea was submitted by ResEx reader, Steven Canfield. If you'd like to download his project, you can get it here. Otherwise, follow along with this tutorial to see how he accomplishes the "voodoo that he do". Build the Interface Launch REALbasic and open the default window: Window1. Add the following controls to the window:
Add the Code With our interface built, double click the PushButton1 to open the Code Editor. In the Action event of the PushButton, add this code: 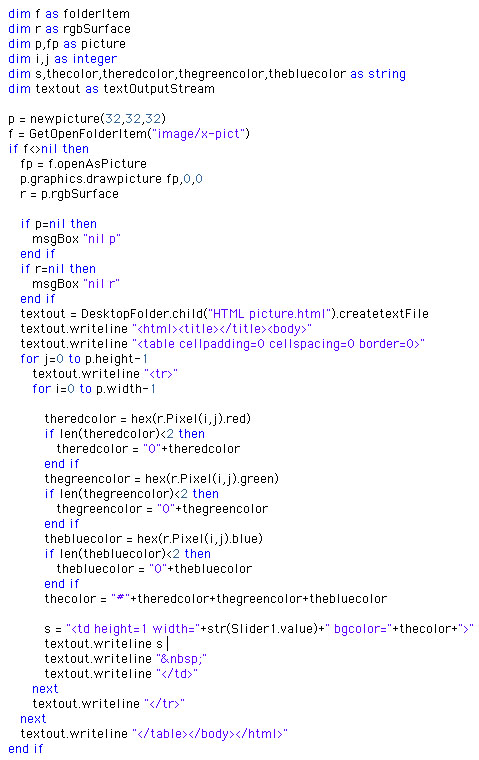
Yep, that's it! Now, to explain what this code does. The main idea behind this code is to open an image, scan through each pixel in that image, and finally recreate it as an HTML table. To simplify matters, we'll name the file "HTML picture.html" and place it on the desktop. Next, we create two loops. One loop scans through the image one row at a time. The other loop (which is embedded within the first loop) scans through all columns of the image. As we loop through each pixel of the image, we extract the red, green, and blue color information from the pixel. Using this color information, we then construct the individuals cells of an HTML document. By now, I bet you're wondering what that RGBSurface stuff is about. An RGBSurface is a useful tool for scanning through the pixels of an image at high speed. The speed increase over the Pixel property of a Graphics class is amazing, so be certain to use it whenever possible. Another thing you should know about this code involves the slider. The slider is included for two reasons. First, it allows you to stretch the image to different widths. This gives you the opportunity to play with variations of the same image. It also serves a second important role. Despite using HTML as a standard, not all browsers are created equal. The slider permits you to tweak the HTML to suit your particular browser. If you plan on publishing this HTML, you may simply have to find a happy medium for the slider value that agrees with the output of popular browsers. One final note... use small images (32x32 images work well) or you may be waiting awhile for your browser to attempt to render the image. Browsers don't render tables particularly fast and it is easy to imagine how much a table of 100 rows and columns could slow down any browser. The best advice is to experiment with various image sizes until you find something that works for you. Conclusion When you're done, select Debug-Run to load your favorite image and convert it into HTML. If you'd like to download this week's example instead of typing it in, you can download the completed project. See you next week! |
||||

|
||||||||||||||||||||||||||||||||
Maintained by the Staff of ResExcellence. This entire site ©1997-2006 ResExcellence
Privacy Statement? Sure we gotta Privacy Statement.
[an error occurred while processing this directive]