
Articles 3D Audio Custom Controls General RB Graphics Hacks Mac OS X Menus Novelty Printing REALbasic 2005 REALbasic 2006 Registration Resources Reviews Serial Speech Sockets XML Video Resource Links News Current News February 2006 January 2006 December 2005 November 2005 October 2005 September 2005 August 2005 July 2005 June 2005 May 2005 April 2005 March 2005  REALbasic for Dummies by Erick Tejkowski  Learning REALbasic through Applications REALbasic for Macintosh REALbasic Cross-Platform Application Development 
Older files are in Stuffit 5 or greater format. Newer files are ".Zip". Download StuffIt Expander |
|

This week we'll create a fun REALbasic project that spits out audio files. These audio files will play a tone like your telephone produces when you press the number keys. Background Telephones keypads in the United States produce tones in a unique manner called "DTMF". DMTF stands for Dual-Tone Multi-Frequency. There's no need to sweat the terminology if you're a technophobe. All it really means is that each row and column on a telephone keypad produces a unique tone. In other words, The 1, 4, 7, and * keys all share a common tone, and keys 1, 2, 3 produce a common tone. When you press a key, it sounds two simultaneous tones (hence the Dual in DTMF). If you'd like to hear the tone for a particular row or column, pick up your telephone and press two keys in the same row or column. The tone you hear is the frequency that the row or column shares. For the technically inclined out there, these tones are pure sine waves. So, in our code, we will produce audio files that contain sine waves of the two tones for any particular telephone key. If you'd like to know more about how DTMF and phones work, there's lots of info on the web. Try this site or do a search on Google for DTMF. The good news is that I (along with some help from Cubie award winner Wade) have taken care of the hard part of creating the tones for you and put them in a RB class. You just have to "wire up" the class in your own project to take advantage of it. So, let's get started. Build the Interface Launch REALbasic and open Window1. To the window add 12 PushButtons and rename the "1" key, giving it a name like "NumKey" and change its Index property to a value of 0 (zero). Then copy the "NumKey" name to the clipboard and select the "2" key and paste the name in for this key. When you press return, you should notice that the Index property will automatically increment to the next available number. Continue in this fashion for each key. When you're finished, you should have twelve PushButtons that share the same name, but each with a unique index number between 0 and 11 inclusive. Next, add a checkbox to the window and give it some descriptive text. We will use this checkbox to decide if we want the two tones played together as we do on a phone, or separated between the stereo field, with one tone in the left speaker and one in the right. This is just so you can hear the tones separated like the example above where you pressed two keys on the phone at once. Finally, add a ChasingArrow control to the window and make it invisible by unchecking its Visible property. It takes a little while to produce an audio file, so we will use this to show the user that we are hard at work producing the file. You may arrange the interface however you want, but it might look something like this. 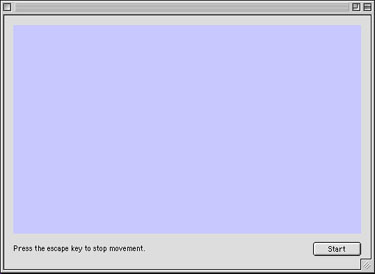
Add the Code To create phone tones, you'll need to either download the phone tone class or download the completed project listed at the end of this tutorial. If you choose to download the class, drag it into your project window. If you download the completed project, it already contains the class. Next, enter the following code in the Action event of any of the Window1 PushButtons (they share the same code since they are an array of controls): 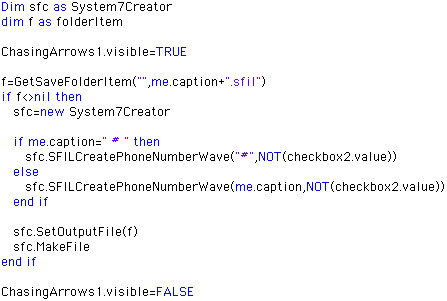
First, this code turns on the ChasingArrows to show that a process is taking place. Then the code asks for a file where the user may save the audio. If one is chosen, the code then creates a new object based on the phone tone class (named "System7Creator"). Once the object is created, we send it the following messages:
When the code has done its thing, hide the ChasingArrows again. Conclusion Well, that's it! Run the project and when you're happy with the results, build it. This project should work just fine on Carbon as well. If you'd like to download this week's example instead of typing it in, you can download the completed project. Oh, and if you've made it this far... look at the first and last initials in my name versus the title of this project to see if you can figure out my poor excuse for humor. Honest, there's a joke in there somewhere. See you next week! |
||||


|
||||||||||||||||||||||||||||||||
Maintained by the Staff of ResExcellence. This entire site ©1997-2006 ResExcellence
Privacy Statement? Sure we gotta Privacy Statement.
[an error occurred while processing this directive]