






 |
 |
 |
|
 |
|
 |
 |
System Scripts Scripts for appearance, monitor resolution, and more. Contents: Evan Francois loved the Orbit Clock from BlueSkyHeart Graphics, but accurately positioning it was a little cumbersome, so he wrote a little Applescript to automate the process for any monitor size! (Be sure to change the paths to the picture and clock!)
As an exercise, Ben Lukens pulled out his Script Editor and whipped up this script: This script will activate balloon help as if they were tooltips. If you pause your mouse over an item for a second, balloon help will turn on until you move your mouse again. It's actually pretty cool, and it's a heck of alot more convenient than turning balloons on from the menu. A couple of prerequisites though: Once you have all that, just save the following as a stay-open application, and run it.
Now, it is just an applescript, with isn't really suited for something like this. As such, the balloons don't turn on and off and smooth as one would like. Something more low level, like an extension, would probably do a much better job. Maybe this will inspire somebody. :)
The example on the right uses the clip command from Akua Sweets scripting addition. Once you download the file, drag it onto the System Folder and it will be deposited in the Scripting Additions folder. A folder called "Copy to Clipboard" can be placed in the Apple Menu containing any text you wish to have at your finger tips. Macintosh computer consultant, Christian Boyce shows how to assign proportional scroll bars with AppleScript:
I modified John Gunnison's previous scipt to add dialogs and confirmations:
Download the compiled script. John Gunnison takes our recent scroll bar AppleScript, and adds several new features. This version presents a dialog box to select the style of arrows, then follows up with confirming dialog. This simple script demonstrats great flow control for the beginner to study: on run Download the compiled script. Jason Zimmer has submitted several Applescripts that demonstrate how to modify the Appearance Control Panel. For example:
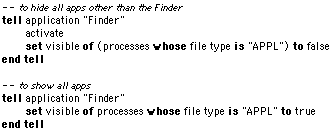
Modify and save this script as an application and double-click your way to a new look! John Pugh has written an excellent collection of 33 scripting additions called Jon's Commands. This tidbit focuses on the commands that control the monitor size and depth. Installation: After downloading the small file, installation is as simple as dragging Jon's Commands on top of the System Folder. It will automatically be routed to the Scripting Additions folder. There is no need to restart, the commands are readily available. To see the commands in action, launch Apple's Script Editor and type the following simple command and run it: screen list Depending on your monitor type, the Result window may display a surprising amount of info! These are all the possible monitor depths, screen sizes, and refresh rates that your current setup supports. Additionally, there is information on the number of monitors connected to the computer, and whether the setting is considered a Safe Resolution (True/False). Safe Resolutions correspond to the Recommended settings in the Monitor & Sounds control panel. Don't be intimidated by the listing; we only care about a few of the many settings. Examples: Assuming these settings are supported on your monitor, type the following into the Script Editor and run it: set screens to {color depth:8, in color:false } Your screen should have switched to 256 shades of grey. To switch back, set in color to true! Switching monitor depth is easy too: set screens to {color depth:16} -- 16 bit, thousands of colors set screens to {color depth:8} -- 8 bit, 256 colors Ok. How about screen size! Lots of people have been asking for that. set screens to {screen size:{800, 600}, refresh rate: 75} -- Make it big! set screens to {screen size:{640,480}, refresh rate: 60} -- Make it small! What could be simpler! Here are a list of the commands for set screens to: name string -- The name of this type of screen. screen id integer -- The unique id of the screen. screen size point -- The height and width of the screen. bounds bounding rectangle -- The boundary rectangle for the screen. refresh rate integer -- The refresh frequency of this monitor. color depth small integer -- The screen color depth setting. in color boolean -- If the screen is in color (versus grayscale). has menu bar boolean -- If this is the main screen which the menu bar is on. supported resolutions a list of record -- The resolutions supported by this monitor . resolution index integer -- The index into the supported resolutions list for this resolution. safe resolution boolean -- Is this resolution safe or does it require user confirmation? Once you have a little script to accomplish your screen switching goal, save it as an Application and you can double-click it at any time. If you're using OSA menu, save it as a compiled script and put it in the Universal Scripts folder. Here are a couple of simple Applescripts to Hide All/Show All from Victor Yee. One way to trigger them is by assigning them to Function Keys in the Keyboard Control Panel, another is with OSA Menu.
APPL is the creator code for the Finder. You can easily modify the scripts to show/hide an application by changing the code.
|
 |
||
 |
 |
 |
|
 |





 |
 |
 |
||||||||||||||||||||||||||||||
 |
|
 |
||||||||||||||||||||||||||||||
 |
 |
 |
Maintained by the Staff of ResExcellence. This entire site ©1997-2006 ResExcellence
Privacy Statement? Sure we gotta Privacy Statement.
[an error occurred while processing this directive]