Watch it shine, shimmer, and sparkle! Using a few simple graphics, a Timer, and a dozen lines or so of code, you can create some nice looking graphics effects. It's a great trick for sprucing up your About Box, so let's get started.
Prep Work
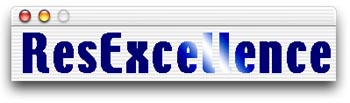
The first step for this project is to create some graphics. You'll need two images saved in PICT format. One is a basic black and white image. Wherever black appears in the image is where the light will "shine" through. For example, I used a simple graphic of the ResExcellence logo. In your graphics application, figure out the height and width of the image and write them down.
![]()
Next, create an image that is twice as wide as the first image. To it, add a gradient. This image can have as many colors as you'd like. For the best effect, make the gradient at an angle like this:
![]()
Build the Interface
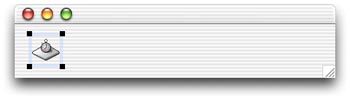
Launch REALbasic and drag the two images you just created into the Project window. Next, open Window1 and resize it to the same dimensions as your first image. For example my ResExcellence image has dimensions of 370 x 62. Finally, add a Timer to the window and change its Period to 20. The final result will look something like this:
Add the Code
Open the Code Editor for Window1 and add three new properties to the window using the Edit-New Property menu. Define the three properties like this:
direction as boolean
p as picture
x as integer
The direction property will keep track of which way the animation is going (left or right, where left=TRUE and right=FALSE). The p property holds the image and x tracks the x-position of the graphics.
Finally, it's time to add the code. Navigate to the Open event of Window1 and add this code:
direction=true
x=0
p=newpicture(370,62,32)
This snippet of code sets up the various properties. Direction (TRUE) is in a leftwards direction, X=0, and p is a new Picture object the same size as the ResExcellence image from earlier.
Next, add this code to the Action event of Timer1.
p.Graphics.DrawPicture gradient,x,0
p.Mask.Graphics.DrawPicture logo,0,0
self.backdrop = p
if direction = TRUE then
x = x - 10
if x<-360 then
direction = FALSE
end if
else
x = x + 10
if x>-10 then
direction = TRUE
end if
end if
This code does the drawing and "animation". First we draw the gradient to the picture and then mask it with the ResExcellence image. Notice that the gradient is drawn using the x property for the x-coordinate. The remainder of the code increases or decreases the value of x based on direction. To test, select Debug-Run. If all goes well, you should see a shimmering effect in the letters of the ResExcellence logo.
Conclusion
As usual, you can download the completed project if you don't feel like recreating it yourself. See you next week!