![]() If you still code your HTML by hand like I sometimes do, then this week's tutorial is for you! This time we'll build a simple little utility for generating HTML IMG tags. Just drag your images into the window and our project takes care of the rest.
If you still code your HTML by hand like I sometimes do, then this week's tutorial is for you! This time we'll build a simple little utility for generating HTML IMG tags. Just drag your images into the window and our project takes care of the rest.
Build the Interface
Launch REALbasic. Open Window1 and add two Editfields to it. You can also label the interface with StaticText controls or something else appropriate. An example interface might look like this:
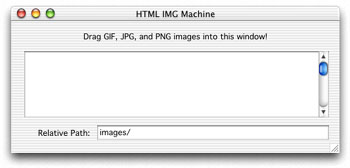
EditField1 is the one on top. Change its MultiLine property to TRUE in the Properties Window. That's it! Now, on to some code...
Source Code
To begin coding, navigate to the Open event of Window1 and add this code:
me.acceptFileDrop "image/jpeg"
me.acceptFileDrop "image/gif"
me.acceptFileDrop "image/png"
Then, navigate to the DropObject event of Window1 and add the following code
dim p as picture
dim s,q,w,h,relativePath as string
q=chr(34)//quotation mark
relativePath=EditField2.text
if obj.FolderItemAvailable then
//Loop thru all images
//dropped on the window
do
//open the image
p=obj.folderItem.openasPicture
//learn its size
w=str(p.width)
h=str(p.height)
//Build HTML string
s="<img src="+q+relativePath+obj.folderItem.name+q
s=s+" width="+w+" height="+h+" >"+chr(13)
//display string in interface
editfield1.text=editfield1.text+s
//bottom of the loop
loop until not obj.NextItem
end if
//select all of the text in EditField1
//so it's easy for the user
//to copy to the clipboard
editfield1.selstart=0
editfield1.selLength=len(editfield1.text)
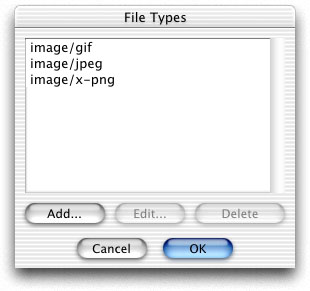
Finally, add some file types to your project. Since web pages most often use GIF, JPG, and PNG files, these are the types we chose to add. Select the Edit-File Types menu and create each of the following file types:
Conclusion
That's all for this week. You can download the completed project here; or you can grab the compiled applications for OS 9 or OS X. Have fun and see you next week!