 Just because "Dan the Desktop Man" is out of town doesn't mean we can't see some new desktop images. This week we'll build a project that generates random kaleidoscope-style images. This project lets you set colors, shapes, and image size to produce a wide variety of desktop images.
Build the Interface
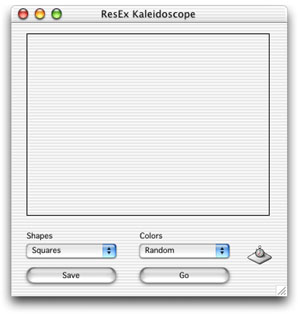
Before you get started on this project, download the Flicker Free Canvas we used in earlier projects. Then, launch REALbasic and open Window1. Unstuff the flickerFreeCanvas and drag it in your REALbasic project.
Next, add the following controls:
| Control Type | Control Name | Other Properties |
| Canvas | Canvas1 | Super=flickerFreeCanvas |
| PushButton | PushButton1 | Caption=Go |
| PushButton | PushButton2 | Caption=Save |
| PopupMenu | PopupMenu1 | InitialValue:Squares Circles |
| PopupMenu | PopupMenu2 | InitialValue:Random Reds Greens Blues Reds and Greens Greens and Blues Reds and Greens |
| Timer | Timer1 | Mode=0; Period=20 |
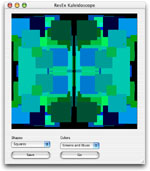
Arrange the interface however you desire. A sample might look like this:
Source Code
Before adding code, we need to do two things: define a property and add a file type. Double click any part of the Window1 interface to open its Code Editor. Then, select Edit-New Property. Create a Picture property like this:

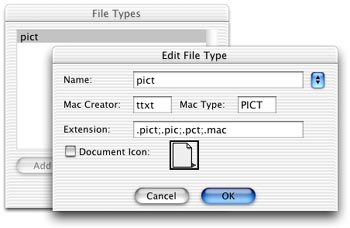
To add the file type, select Edit-File Types and add "pict" to the fray:
OK, now we're ready for some code. Navigate to the Action event of PushButton1 and add this code:
if me.caption = "Go" then
me.caption = "Stop"
p=newpicture(canvas1.width,canvas1.height,32)
if p<>nil then
p.graphics.foreColor=rgb(0,0,0)
p.graphics.fillrect 0,0,p.width,p.height
end if
Timer1.mode = 2
else
Timer1.mode = 0
me.caption = "Go"
end if
This code create a new image, toggles Timer1, and changes the caption on PushButton1.
Next, navigate to the Action event of Timer1 and enter this code
dim rx,ry,rs as double
dim square as boolean
if popupMenu1.listindex=0 then
square=TRUE
else
square=FALSE
end if
if p<>nil then
//split the canvas(and picture) into four quadrants
// 1 | 2
//------------
// 3 | 4
// find a random "size" value
rs = rnd * ((p.height/4)+1)
//get a random point in the top left quadrant
//to begin drawing
// find a random x value
rx = rnd * ((p.width/2)-rs+1)
// find a random y value
ry = rnd * ((p.height/2)+1)
select case popupMenu2.listindex
'Random
'Reds
'Greens
'Blues
'Reds and Greens
'Greens and Blues
'Reds and Greens
case 0
p.graphics.foreColor=rgb(rnd*255,rnd*255,rnd*255)
case 1
p.graphics.foreColor=rgb(rnd*255,0,0)
case 2
p.graphics.foreColor=rgb(0,rnd*255,0)
case 3
p.graphics.foreColor=rgb(0,0,rnd*255)
case 4
p.graphics.foreColor=rgb(rnd*255,rnd*255,0)
case 5
p.graphics.foreColor=rgb(0,rnd*255,rnd*255)
case 6
p.graphics.foreColor=rgb(rnd*255,0,rnd*255)
end select
if square then
//SQUARES
//draw a shape in quadrant 1
p.graphics.fillrect rx,ry,rs,rs
//draw a shape in quadrant 2
p.graphics.fillrect p.width-rx-rs,ry,rs,rs
//draw a shape in quadrant 3
p.graphics.fillrect rx,p.height-ry-rs,rs,rs
//draw a shape in quadrant 4
p.graphics.fillrect p.width-rx-rs,p.height-ry-rs,rs,rs
else
//CIRCLES
//draw a shape in quadrant 1
p.graphics.filloval rx,ry,rs,rs
//draw a shape in quadrant 2
p.graphics.filloval p.width-rx-rs,ry,rs,rs
//draw a shape in quadrant 3
p.graphics.filloval rx,p.height-ry-rs,rs,rs
//draw a shape in quadrant 4
p.graphics.filloval p.width-rx-rs,p.height-ry-rs,rs,rs
end if
canvas1.mPicture = p
canvas1.redraw
end if
This code does the actual drawing. It splits the image up into four sections. A random size and position is then selected and a shape is drawn in each quadrant of the image according to these random numbers.
Finally, navigate to the Action event of PushButton2 and add this code:
dim f as folderItem
if timer1.mode<>0 then
PushButton1.push
end if
f=GetSaveFolderItem("pict","ResEx Kaleidoscope Desktop.pct")
if f<>nil then
f.saveaspicture canvas1.mPicture
end if
This code lets you save the image as a PICT file when you're finished.
Conclusion
That's all for this week. You can download the project or the built applications (for OS 9 or OS X) to try things out. So, get to work creating some fun desktop images and send them to Dan. See you next week! 666 Killer No demons here... just a virus. If you've ever been bitten by the 666 virus (or one of its variants), Toon Van Acker has some relief for you. After discovering that the virus had left a copy of itself in any app in use, he coded a fix for it in REALbasic. Check out 666 Killer